The Adventures of Systems Boy!

Confessions of a Mac SysAdmin...

NetBoot Part 4

Monday, March 31, 2008
So this is going great. I have a really solid Base OS Install, and a whole buttload of packages now. Packages that set everything from network settings to custom and specialized users. I can build a typical system in about 45 minutes, and I can do most of the building from my office (or any other computer in the lab that has ARD installed).

I'm also getting fairly adept at making packages. A good many of my packages are just scripts that make settings to the system, so I'm getting pretty handy with the bash and quite intimate with dscl. But, perhaps most importantly, I'm learning how to make all sorts of settings in Leopard via the command-line that I never knew how to do.

The toughest one so far has been file sharing. In our lab we share all our Work partitions to the entire internal network over AFP and SMB. In the past we used SharePoints to modify the NetInfo database to do so, but this functionality has all been moved over to Directory Services. To complicate matters, SAMBA no longer relies simply on standard SMB configuration files in standard locations, and the starting and stopping of the SMB daemon is handled completely by launchd. So figuring this all out has been a headache. But I think I've got it!

Setting Up AFP
Our first step in this process is setting up the share point for AFP (AppleFileshareProtocol) sharing. This wasn't terribly difficult to figure out, especially now that I've been using Directory Services to create new users. To create an AFP share in Leopard, you use dscl. Once you grok the syntax of dscl it's fairly easy to use. It basically goes like this:
command node -action Data/Source value


The "Data Source" is the thing you're actually operating on. I like to think of it as a plist entry in the database — like a hierarchically structured file — which it basically is, or sometimes I envision the old-style NetInfo structures. To get the needed values for my new share, I used dscl to look at a test share I'd created in the Sharing Preferences:
dscl . -read SharePoints/TEST


The output looked like this:
dsAttrTypeNative:afp_guestaccess: 1
dsAttrTypeNative:afp_name: TEST
dsAttrTypeNative:afp_shared: 1
dsAttrTypeNative:directory_path: /Volumes/TEST
dsAttrTypeNative:ftp_name: TEST
dsAttrTypeNative:sharepoint_group_id: XXXXXXXX-XXXX-XXXX-XXXX-XXXXXXXXXXX
dsAttrTypeNative:smb_createmask: 644
dsAttrTypeNative:smb_directorymask: 755
dsAttrTypeNative:smb_guestaccess: 1
dsAttrTypeNative:smb_name: TEST
dsAttrTypeNative:smb_shared: 1
AppleMetaNodeLocation: /Local/Default
RecordName: TEST
RecordType: dsRecTypeStandard:SharePoints


Okay. So I needed to use dscl to create a record in the SharePoints data source with all these values. Fortunately, the "sharepoint_group_id" is not required for the share to work, because I'm not yet sure how to generate that number. But create the share with all the other values and you should be okay:
sudo dscl . -create SharePoints/my-share
sudo dscl . -create SharePoints/my-share afp_guestaccess 1
sudo dscl . -create SharePoints/my-share afp_name My-Share
sudo dscl . -create SharePoints/my-share afp_shared 1
sudo dscl . -create SharePoints/my-share directory_path /Volumes/HardDrive
sudo dscl . -create SharePoints/my-share ftp_name my-share
sudo dscl . -create SharePoints/my-share smb_createmask 644
sudo dscl . -create SharePoints/my-share smb_directorymask 755
sudo dscl . -create SharePoints/my-share smb_guestaccess 1
sudo dscl . -create SharePoints/my-share smb_name my-share
sudo dscl . -create SharePoints/my-share smb_shared 1


This series of commands will create a share called "My-Share" out of the drive called "HardDrive."

After modifying the Directory Services database, it's always smart to restart it:
sudo killall DirectoryService


And we need to make sure AFP is running by starting the daemon and reloading the associated Launch Daemons:
sudo AppleFileServer
sudo launchctl unload /System/Library/LaunchDaemons/com.apple.AppleFileServer.plist
sudo launchctl load -F /System/Library/LaunchDaemons/com.apple.AppleFileServer.plist


Not the easiest process, but not too bad. SMB was much tougher to figure out.

Setting Up SMB
Setting up SMB works similarly, but everything is in a completely different and not-necessarily standard place. To wit, Leopard has two different smb.conf files: one that's auto-generated (and which you should not touch) in /var/db, and one in the standard /etc location. Fortunately, it turned out, I didn't have to modify either of these. But still, it led to some confusion. The way SMB is managed in Leopard is rather roundabout and interdependent. Information about SMB share is stored in flat files — one per share — in /var/samba/shares. So, to create our "my-share" share, we need a file named for the share (but all lower-case):
sudo touch /var/samba/shares/my-share


And in that file we need some basic SMB info to describe the share:
#VERSION 3
path=/Volumes/HardDrive
comment=HardDrive
usershare_acl=S-1-1-0:F
guest ok=yes
directory mask=755
create mask=644


Next — and this was the tough part to figure out — we need to modify one, single, very important preference file that basically informs Launch Services that SMB should now be running:
sudo defaults write /Library/Preferences/SystemConfiguration/com.apple.smb.server "EnabledServices" '(disk)'

This command modifies the file com.apple.smb.server.plist in our /Library/Preferences/SystemConfiguration folder. That file is watched by launchd such that when it is modified thusly, launchd knows to start and run the smbd daemon in the appropriate fashion. Still, for good measure, I like to reload the LaunchDaemon for the SMB server by hand. Don't need to, but it's a nice idea:
sudo launchctl unload /System/Library/LaunchDaemons/com.apple.smb.server.preferences.plist
sudo launchctl load -F /System/Library/LaunchDaemons/com.apple.smb.server.preferences.plist


That's pretty much it! There are a few oddities: For one, the new share will not initially appear in the Sharing Preferences pane, nor will the Finder show it as a Shared Folder when you open the window.


Shared Folder: This Won't Show Without a Reboot
(click image for larger view)


But the share will be active, and all will be right with the world after a simple reboot. (Isn't it always!) Also, if you haven't done it already, you may have to set permissions on your share using chmod in order for anyone to see it.

I was kind of surprised at how hard it was to set up file sharing via the command-line. But I'm glad I stuck with it and figured it out. It's good knowledge to have.

Hopefully someone else will find it useful as well.

Labels: , , , , ,

Remote Management Commands in Leopard

Tuesday, November 20, 2007
A while ago I wrote about the networksetup command, which provides a command-line interface to network preferences, as well as the systemsetup command, which provides command-line control over additional system-level preferences. In the past those commands were stored in the labyrinthian:
/System/Library/CoreServices/RemoteManagement/ARDAgent.app/Contents/Support

Yes, inside the ARDAgent. Perfect.

Finally Apple has put those commands in a location the shell recognizes as a command path. In Leopard they reside in the far more sensible:
/usr/sbin

Now all you have to do to call them is... Well... Call them.

Really now. Was that so hard?

Labels: , ,

Apple Remote Desktop Copy Problems

Friday, October 12, 2007
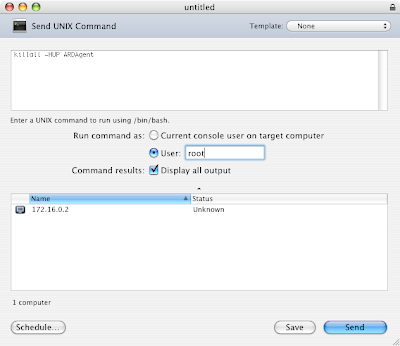
Prosaic title, I know. But it's true. Every now and then, copying to remote systems via Apple Remote Desktop fails inexplicably. Fortunately, the solution is a simple one: restart the ARD Agent, conveniently named ARDAgent. Said command will look something like this:

sudo killall -HUP ARDAgent

Ironically, you can also send the command to the offending system via ARD itself. Just be sure you remove the sudo and send it as root.


Restarting ARD Via ARD
(click image for larger view)


That's it! Just another helpful tip from your friendly neighborhood Systems Boy.

Please resume your normal activities.

Labels: , ,

External Network Unification Part 5: Almost There

Thursday, June 28, 2007
It's been quite some time since I've been able to post anything of any substance. This has a lot to do with the fact that I've been super busy relocating our department and participating in the gut renovation of our lab. This has been an immensely stressful process, but in the end I find that I've learned so much from it, I simply can't complain. I'm coming out a far better SysAdmin than I was going in. And that's a remarkably valuable thing to both me and my employers.

But moving and planning the physical aspects of the new lab has only been a portion of what I've been working on. This renovation has been the perfect opportunity to rebuild our network infrastructure, and part of said rebuilding has resulted in the near completion of our authentication unification project. At this point we've gone from eight different authentication servers — that is, anytime we created a new user, we had to do so on eight different systems — all the way on down to two. Which means that now, anytime we create a new user, we do so on two machines.

Our goal is to get it down to one, hopefully before the Fall semester begins. Our mail server is proving to be the most difficult machine to get working with LDAP authentication, mainly because it authenticates mail users through the wonders of some weird combination of authd, Courier and PAM, and we've yet to crack the magical code that gets these all working in tandem via LDAP. Aside from Mail, though, everything is done. So I thought I'd take a bit of my hard-earned vacation and loosely describe to you how it's all working.

Before I start I'd like to just acknowledge all the help I've had from my fellow SysAdmins in the department. I had a huge amount of assistance on the *NIX server side of things, as well as with network infrastructure and even some last-minute PHP finagling without which this project would have taken significantly longer. In fact, all I really had to do was build the authentication servers and clearly articulate what I wanted. I'm extremely grateful to everyone who helped out.

The little bit of network infrastructure I mentioned is our DMZ. We now have a proper — and more importantly, properly secured — DMZ on which to place an authentication server. I won't go into too much detail here, but suffice to say, having a secure DMZ gives us all kinds of options for authentication between internal and external networks, and makes me feel a whole lot better about using Mac OS X Server as our authentication system for both networks.

Yes, we are using Mac OS X Server to authenticate our entire network. The reason is because Mac OS X Server is the most mature and usable implementation of LDAP for user authentication available on the market today. Is it perfect? No. Is it completely secure? Probably not. Is there anything that even comes remotely close to being able to handle the complexities of user management and database redundancy across platforms with such remarkable ease-of-use? Nope. Nothing. We tried building our own custom LDAP server, which would have been excruciating, and would have taken forever. We tried Red Hat's Directory Server, which looks like it will eventually turn into something to match Mac OS X Server, but which just wasn't yet up to snuff. Nothing matched Mac OS X Server, which did everything we wanted it to, right out of the box and with a minimum of fuss. In fact, once the user database is built, building a Mac OS X master or replica authentication server is a complete and total breeze. At the time of our building and testing it was really the only practical option.

So, here in a nutshell, is what we have:

Internal Network
All authentication originates from the internal network. Passwords can only be changed from the internal network at this time, which is by design. Systems on the internal network include:
  • Master Authentication Server
    Hosts authentication for... Well... Everything, really. This is essentially the same server we used all last year for all our internal authentication needs for Mac, Linux and Windows workstations. It's now being used to push authentication to the external network as well.
  • Internal Replica Authentication Server
    This provides replication of the Master. Should the master fail, the Replica is intended to pick up services (though this doesn't always work perfectly).
  • File Servers
    We have two file servers on the internal network — a Mac and a Linux box — both of which authenticate directly against the Master.
  • Workstations
    We have about 30 Mac, Windows and Linux machines all authenticating to the Master.

DMZ
The DMZ sits between the Big Bad Internet (BBI) and the internal network. It has its own firewall that is fairly strict about what can get in from the BBI. All DMZ authentication originates from the internal network, but is provided by a single server which sits on the DMZ. Systems on the DMZ include:
  • External Authentication Server
    This server is also a replica of our Master, but it's not intended as a failsafe. Rather, it provides authentication services to the entire DMZ. It gets its user database, of course, from the Master. But for other systems to bind to an LDAP server, its role must either be "Master" or "Replica." Setting the role to "Connected to a Directory Server" won't work. In addition to sitting on our DMZ, which is properly firewalled against the harsh realities of the Big Bad Internet (BBI), this system also makes use of its own strict local firewall for an extra added layer of security. Also, all replication communication between Replica (DMZ) and Master (Internal) is encrypted.
  • Data Server
    In addition to unifying authentication, we've also consolidated data storage and access wherever possible. In the past, for instance, movies streamed from the Quicktime Server were stored on that machine's local drive. Web sites were stored on our web server. So, building a web site that used Quicktime Streaming required users to log into two separate machines — the Web Server and the Quicktime Streaming Server. Now we're storing all user-generated content on a separate, dedicated machine — our Data Server — and sharing that machine out to the various servers via NFS. Centralizing this data store means users have only to log on to one server for anything they ever want to do. And also that only that server needs to authenticate users. And yes, that server authenticates them via LDAP on our External Authentication Server. All neat and tidy. Internal and external home account data is still segregated, however — users still have separate internal and external data storage. Though, if we could figure out how to do it securely, this could change.
  • Quicktime Streaming Server
    This machine also uses its own local firewall. It gets its user database from our External Authentication Server over secure channels using the "Connected to a Directory System" as its role currently. Ultimately, however, because of the Data Server, this machine will not need to authenticate users. We are leaving the ability open temporarily to accommodate legacy users.
  • Drupal CMS
    Our new Community site is built on the Drupal engine. We're using the LDAP module to authenticate to the External Authentication Server. Drupal's LDAP module is simple and easy to set up, as is the Drupal system as a whole. So far we're very happy with it.
  • Computer Reservations System
    This is a custom web app built long ago by a former student. We've (and by "we" I mean my colleague) basically hacked the PHP code to authenticate via LDAP rather than MySQL.
  • Mail Server
    Currently not authenticating to the External Authentication Server. We're working on this and hope to have it working by the beginning of the school year.

The Future
Yes, there's more we want to do. It's always amazing how, once you've completed something, you immediately start seeing ways to make it better.
  • More Redundancy
    Ultimately, in addition to the Replica, I would also like to automate a clone of the Master's boot drive to an external firewire drive as sort of an ultimate safety. Should anything ever go wrong with the Master, I simply plug the firewire clone into virtually any Mac system on the internal network and I'm back on my feet. It might also be wise to have some sort of failsafe for external authentication as well.
  • More Security
    while our setup is fairly secure right now, there are a few areas I'd like to beef up even more when I get a chance. In particular, our CMS connection is not as secure as I'd like it to be. And ultimately I'd like to harden every machine on the DMZ to the best of my ability.
  • More Unification
    Anything else we can unify — and at this point that's mostly internal and external data — I'm open to considering. It's going to be really interesting for me to look critically at what we've done so far and find the flaws and refine the system. But I'll constantly be looking at ways to simplify our current setup even further without compromising security. The easier our network is to use, the more useful it becomes. We've come a long way, but I'm sure we can find even better ways to do things.
  • More Services
    Now that we have an infrastructure in place for user creation, we can add services freely to our network without the worry of creating users for said services. New services need only the ability to authenticate via LDAP. We're already planning an equipment checkout system, and possibly some calendaring systems.

So, I've just finalized the master authentication server. It's done. Built. Finished. Kaput. The rest of our servers are still in various states of finality, and we have until September to lock them down. But right now, unified authentication is, for all intents and purposes (and with the exception of mail), working. And we couldn't be happier. The ultimate test will be, of course, letting users loose on this new infrastructure. I'm betting they'll like it almost as much as we do. At least the ones who know the old system. New users will be none the wiser. Ain't that always the way?

*Sigh*

Labels: , , , , ,

Scripts Part 7: Contextual Menus with Automator

Saturday, March 31, 2007
Recently, for some odd reason, there has been a spate of solutions to the problem of creating new files in the Finder via a contextual menu. One involves a contextual menu plugin called NuFile. Another involves installing Big Cats Scripts and linking it to an Applescript. But honestly — and I'm surprised someone else didn't think of this first — when faced with simple contextual menu tasks, these days my first thought is to look to Automator.

And by golly, that's just what I did. Here are a few Automator workflows that do, more or less what the afore-linked methods do. To me, the advantage of the Automator approach is that you don't need to install anything. It's all baked in. Which means you don't ever need to update anything either. Nice. Simple. And, yeah, kind of the whole point of Automator.

So here you go. Maybe someone will find this useful, if for nothing other than as an exercise in creating contextual menu functionality with Automator. Or skinning a cat multiple ways. Or something. To use this, download the .zip file, unzip it and place it in:
~/Library/Workflows/Applications/Finder

NewTextFile Workflow

It should become active immediately.

Also, here are a couple variants. One will create a text file, and then open it in TextWrangler (if you have TextWrangler, and if you don't, go get it now); the other creates a Word document, and opens it in Word. I'm far to lazy to completely duplicate the functionality of NuFile. But if you examine these workflows, you can at least see now how that would be possible (in fact, fairly easy) to accomplish.

NewTextFile Workflow Variants

I actually think it would be great if Apple made it drop dead simple to create true contextual menus for the Finder. Fortunately, Automator gets us pretty close.

Oh, yeah, and since this is technically script writing, and since I haven't posted to that series in some time, we're gonna go ahead and call this a Script Sharing post. Deal with it.

Right. Good night.

UPDATE: Revised March 31, 2007, 3:00 PM
Stephan Cleaves has added yet another implementation of this idea. He's using a combination of Automator and AppleScript. I certainly think his implementation is better than mine in a few ways. Certainly more full-featured. It will prompt for a file name, for instance, and takes pains not to overwrite a preexisting file with the same name. Nice. But we're taking very different approaches to the same idea (his version places a file in the front-most Finder window, my version places it in the right-clicked folder), and he was confused by my approach. After speaking to him via comments on his blog, I realized that some clarification as to how my workflow is actually constructed might be in order.

Basically, my workflow takes the folder selected in the Finder as input and assigns that input to the variable "$@". That variable and the for loop in my workflow are automatically generated by Automator when you select “as arguments” from the “Pass input:” field in the “Do Shell Script” action. It’s how you get the context (the selected folder) passed to the script. Apparently Automator takes “$@” as the variable for “the folder you just selected” whenever there’s no input from a previous action. This was something I learned while fiddling around with all of this, and it's really my favorite part. The coolest thing for me here, really, was figuring out how to pass the context — i.e. the right-clicked folder — to an Automator "Do Shell Script" action. This opens up worlds of potential.

Finally, as I said, the for loop in the action is auto-generated by Automator. The workflow will work almost as well with the simple script:
touch “$@/NewText.txt”

Using the for loop, however, allows you to create a new text file in multiple folders by selecting said folders and running the workflow.

It's really kind of amazing how many ways there are to do this. Wow. Fun stuff.

Labels: , , , ,

Replica Reset Voodoo (That Works!)

Saturday, February 10, 2007
So today, after downgrading my master server to 10.4.7, I kept getting an error on my replica. So I decided to reset the replica by demoting it to a "Standalone" role, and then re-promoting it to the "Replica" role. But even after doing this, the error message persisted. The message was telling me to check the logs at:

/var/run/openldap-slurp/replica

and doing so did reveal errors like:

ERROR: Type or value exists: modify/add: memberUid: value #0 already exists

The solution was to again demote the replica to standalone status and then archive all the files in:

/var/run/openldap-slurp/replica

to anywhere else. I put them in a folder called "old." Just get 'em out of the way. Once this was done I was able to promote my replica without receiving error messages.

Yay! That wasn't too bad.

Oh, and you may be asking yourself how I knew to do this. Well, to be honest, I don't really remember. I just know that at some point in the past there was a problem I'd had with a replica and it was caused by stale files. So, since my ultimate goal was to start from scratch, I just got everything out of the way. And lo and behold. It worked. Sorry for the voodoo explanation, though. I wish I could be more explicit. Hell, I wish I fully understood what I was dealing with. But I don't. And, though it pains me to say this, I don't have time to figure it out.

But y'know? I'll take the cure even if I don't know what caused the disease.

Labels: , , ,

Mac OS X Server 10.4.8 Breaks Windows Quotas

Friday, February 09, 2007
It's great to finally have something systems-related to post about amidst the endless bureaucracy that fills my days lately. Of course that means that — yup, you guessed it — something broke. But hey, that's what it's all about. Well, that and the fixing of said brokeness, of course.

So we recently discovered that our Windows clients were suddenly, and without explanation, able to greatly exceed their roaming profile quotas. In fact, looking at the roaming profile drive showed users with upwards of 25 GBs in their roaming profiles, which have quota limits of 50 MB. Not only that, but further testing revealed that Windows client machines wouldn't even complain if they went over quota. Any SMB connection to the roaming profile drive could exceed the quota limit without so much as a complaint from server or client. AFP worked. UNIX worked. But quotas were ignored over SMB. What the fuck?

For three days I've been trying to track this problem down, testing all sorts of quota scenarios and SMB configurations in between meetings and meetings and more meetings. Eventually, when I can't make headway on a problem, I start thinking it might just be a bug. So I started poking around in the Apple Discussions, and I found one and only one complaint of a similar nature: 10.4.8 Server with broken quotas on Windows. Had I recently done a system update that perhaps broke quotas?

So I started thinking about what in a system update could break such a thing. How do quotas work? There is no daemon. A colleague suggested that they were part of the kernel. Had I done anything that would have replaced the kernel in the last month or two?

The answer was yes. Over the winter break I had decided to update the server to version 10.4.8. Upon realizing this I began to strongly suspect that Mac OS X Server 10.4.8 contained a bug that broke quotas over SMB. Fortunately, as is often my practice, I'd made a clone of my 10.4.7 server to a portable firewire drive before upgrading. Testing my theory would be a simple matter of booting off the clone.

Sure enough, after booting from the clone, quotas began behaving properly on Windows clients again. Because I had the clone, reverting the 10.4.8 server back to 10.4.7 was a simple matter of cloning the contents of the firewire to the server's internal drive and rebooting. Voilà! Problem solved!

From now on I think I'll hold off on server updates unless I really, really need them. When it comes to servers, I think the old adage is best: If it ain't broke, don't fix it.

Labels: , , , ,

Backing Up with RsyncX

Sunday, December 03, 2006
In an earlier post I talked generally about my backup procedure for large amounts of data. In the post I discussed using RsyncX to back up staff Work drives over a network, as well as my own personal Work drive data, to a spare hard drive. Today I'd like to get a bit more specific.

Installing RsyncX
I do not use, nor do I recommend the version of rsync that ships with Mac OS X 10.4. I've found it, in my own personal tests, to be extremely unreliable, and unreliability is the last thing you want in a backup program. Instead I use — and have been using without issue for years now — RsyncX. RsyncX is a GUI wrapper for a custom-built version of the rsync command that's made to properly deal with HFS+ resource forks. So the first thing you need to do is get RsyncX, which you can do here. To install RsyncX, simply run the installer. This will place the resource-fork-aware version of rsync in /usr/local/bin/. If all you want to do is run rsync from the RsyncX GUI, then you're done, but if you want to run it non-interactively from the command-line — which ultimately we do — you should put the newly installed rsync command in the standard location, which is /usr/bin/.¹ Before you do this, it's always a good idea to make a backup of the OS X version. So:

sudo cp /usr/bin/rsync /usr/bin/rsync-ORIG
sudo cp /usr/local/bin/rsync /usr/bin/rsync

Ah! Much better! Okay. We're ready to roll with local backups.²

Local Backups
Creating local backups with rsync is pretty straightforward. The RsyncX version of the command acts almost exactly like the standard *NIX version, except that it has an option to preserve HFS+ resource forks. This option must be provided if you're interested in preserving said resource forks. Let's take a look at a simple rsync command:

/usr/bin/rsync -a -vv /Volumes/Work/ /Volumes/Backup --eahfs

This command will backup the contents of the Work volume to another volume called Backup. The -a flag stands for "archive" and will simply backup everything that's changed while leaving files that may have been deleted from the source. It's usually what you want. The -vv flag specifies "verbosity" and will print what rsync is doing to standard output. The level of verbosity is variable, so "-v" will give you only basic information, "-vvvv" will give you everything it can. I like "-vv." That's just the right amount of info for me. The next two entries are the source and target directories, Work and Backup. The --eahfs flag is used to tell rsync that you want to preserve resource forks. It only exists in the RsyncX version. Finally, pay close attention to the trailing slash in your source and target paths. The source path contains a trailing slash — meaning we want the command to act on the drive's contents, not the drive itself — whereas the target path contains no trailing slash. Without the trailing slash on the source, a folder called "Work" will be created inside the WorkBackup drive. This trailing slash behavior is standard in *NIX, but it's important to be aware of when writing rsync commands.

That's pretty much it for simple local backups. There are numerous other options to choose from, and you can find out about them by reading the rsync man page.

Network Backups
One of the great things about rsync is its ability to perform operations over a network. This is a big reason I use it at work to back up staff machines. The rsync command can perform network backups over a variety of protocols, most notably SSH. It also can reduce the network traffic these backups require by only copying the changes to files, rather than whole changed files, as well as using compression for network data transfers.

The version of rsync used by the host machine and the client machine must match exactly. So before we proceed, copy rsync to its default location on your client machine. You may want to back up the Mac OS X version on your client as well. If you have root on both machines you can do this remotely on the command line:

ssh -t root@mac01.systemsboy.com 'cp /usr/bin/rsync /usr/bin/rsync-ORIG'
scp /usr/bin/rsync root@mac01.systemsboy.com:/usr/bin/

Backing up over the network isn't too much different or harder than backing up locally. There are just a few more flags you need to supply. But the basic idea is the same. Here's an example:

/usr/bin/rsync -az -vv -e SSH mac01.systemsboy.com:/Volumes/Work/ /Volumes/Backups/mac01 --eahfs

This is pretty similar to our local command. The -a flag is still there, and we've added the -z flag as well, which specifies to use compression for the data (to ease network traffic). We now also have an -e flag which tells rsync that we're running over a network, and an SSH option that specifies the protocol to use for this network connection. Next we have the source, as usual, but this time our source is a computer on our network, which we specify just like we would with any SSH connection — hostname:/Path/To/Volume. Finally, we have the --eahfs flag for preserving resource forks. The easiest thing to do here is to run this as root (either directly or with sudo), which will allow you to sync data owned by users other than yourself.

Unattended Network Backups
Running backups over the network can also be completely automated and can run transparently in the background even on systems where no user is logged in to the Mac OS X GUI. Doing this over SSH, of course, requires an SSH connection that does not interactively prompt for a password. This can be accomplished by establishing authorized key pairs between host and client. The best resource I've found for learning how to do this is Mike Bombich's page on the subject. He does a better job explaining it than I ever could, so I'll just direct you there for setting up SSH authentication keys. Incidentally, that article is written with rsync in mind, so there are lots of good rsync resources there as well. Go read it now, if you haven't already. Then come back here and I'll tell you what I do.

I'd like to note, at this point, that enabling SSH authentication keys, root accounts and unattended SSH access is a minor security risk. Bombich discusses this on his page to some extent, and I want to reiterate it here. Suffice to say, I would only use this procedure on a trusted, firewalled (or at least NATed) network. Please bear this in mind if you proceed with the following steps. If you're uncomfortable with any of this, or don't fully understand the implications, skip it and stick with local backups, or just run rsync over the network by hand and provide passwords as needed. But this is what I do on our network. It works, and it's not terribly insecure.

Okay, once you have authentication keys set up, you should be able to log into your client machine from your server, as root, without being prompted for a password. If you can't, reread the Bombich article and try again until you get it working. Otherwise, unattended backups will fail. Got it? Great!

I enable the root account on both the host and client systems, which can be done with the NetInfo Manger application in /Applications/Utilities/. I do this because I'm backing up data that is not owned by my admin account, and using root gives me the unfettered access I need. Depending on your situation, this may or may not be necessary. For the following steps, though, it will simplify things immensely if you are root:

su - root

Now, as root, we can run our rsync command, minus the verbosity, since we'll be doing this unattended, and if the keys are set up properly, we should never be prompted for a password:

/usr/bin/rsync -az -e SSH mac01.systemsboy.com:/Volumes/Work/ /Volumes/Backups/mac01 --eahfs

This command can be run either directly from cron on a periodic basis, or it can be placed in a cron-run script. For instance, I have a script that pipes verbose output to a log of all rsync activity for each staff machine I back up. This is handy to check for errors and whatnot, every so often, or if there's ever a problem. Also, my rsync commands are getting a bit unwieldy (as they tend to do) for direct inclusion in a crontab, so having the scripts keeps my crontab clean and readable. Here's a variant, for instance, that directs the output of rsync to a text file, and that uses an exclude flag to prevent certain folders from being backed up:

/usr/bin/rsync -az -vv -e SSH --exclude "Archive" mac01.systemsboy.com:/Volumes/Work/ /Volumes/Backups/mac01 --eahfs > ~/Log/mac01-backup-log.txt

This exclusion flag will prevent backup of anything called "Archive" on the top level of mac01's Work drive. Exclusion in rsync is relative to the source directory being synced. For instance, if I wanted to exclude a folder called "Do Not Backup" inside the "Archive" folder on mac01's Work drive, my rsync command would look like this:


/usr/bin/rsync -az -vv -e SSH --exclude "Archive/Do Not Backup" mac01.systemsboy.com:/Volumes/Work/ /Volumes/Backups/mac01 --eahfs > ~/Log/mac01-backup-log.txt

Mirroring
The above uses of rsync, as I mentioned before, will not delete files from the target that have been deleted from the source. They will only propagate changes that have occurred on the existing files, but will leave deleted files alone. They are semi-non-destuctive in this way, and this is often useful and desirable. Eventually, though, rsync backups will begin to consume a great deal of space, and after a while you may begin to run out. My solution to this is to periodically mirror my sources and targets, which can be easily accomplished with the --delete option. This option will delete any file from the target not found on the source. It does this after all other syncing is complete, so it's fairly safe to use, but it will require enough drive space to do a full sync before it does its thing. Here's our network command from above, only this time using the --delete flag:

/usr/bin/rsync -az -vv -e SSH --exclude "Archive/Do Not Backup" mac01.systemsboy.com:/Volumes/Work//Volumes/Backups/mac01 --delete --eahfs > ~/Log/mac01-backup-log.txt

Typically, I run the straight rsync command every other day or so (though I could probably get away with running it daily). I create the mirror at the end of each month to clear space. I back up about a half dozen machines this way, all from two simple shell scripts (daily and weekly) called by cron.

Conclusion
I realize that this is not a perfect backup solution. But it's pretty good for our needs, given what we can afford. And so far it hasn't failed me yet in four years. That's not a bad track record. Ideally, we'd have more drives and we'd stagger backups in such a way that we always had at least a few days backup available for retrieval. We'd also probably have some sort of backup to a more archival medium, like tape, for more permanent or semi-permanent backups. We'd also probably keep a copy of all this in some offsite, fireproof lock box. I know, I know. But we don't. And we won't. And thank god, 'cause what a pain in the ass that must be. It'd be a full time job all its own, and not a very fun one. What this solution does offer is a cheap, decent, short-term backup procedure for emergency recovery of catastrophic data loss. Hard drive fails? No trouble. We've got you covered.

Hopefully, though, this all becomes a thing of the past when Leopard's Time Machine debuts. Won't that be the shit?

1. According to the RsyncX documentation, you should not need to do this, because the RsyncX installer changes the command path to its custom location. But if you'll be running the command over the network or as root, you'll either have to change that command path for the root account and on every client, or network backups will fail. It's much easier to simply put the modified version in the default location on each machine.

2. Updates to Mac OS X will almost always overwrite this custom version of rsync. So it's important to remember to replace it whenever you update the system software.

Labels: , , , ,

Using SSH to Send Variables in Scripts

Wednesday, November 22, 2006
In July I posted an article about sending commands remotely via ssh. This has been immensely useful, but one thing I really wanted to use it for did not work. Sending an ssh command that contained a variable, via a script for instance, would always fail for me, because, of course, the remote machine didn't know what the variable was.

Let me give an example. I have a script that creates user accounts. At the beginning of the script it asks me to supply a username, among other things, and assigns this to a variable in the script called $username. Kinda like this:

echo "Please enter the username for the new user:"
read username


Later in the script that variable gets called to set the new user's username, and a whole bunch of other parameters. Still later in the script, I need to send a command to a remote machine via ssh, and the command I'm sending contains the $username variable:

ssh root@home.account.server 'edquota -p systemsboy $username'


This command would set the quota of the new user $username on the remote machine to that of the user systemsboy. But every time I've tried to include this command in the script, it fails, which, if you think about it, makes a whole lot of sense. See, 'cause the remote machine doesn't know squat about my script, and when that command gets to the remote machine, the remote machine has no idea who in the hell $username is. The remote machine reads $username literally, and the command fails.

The solution to this is probably obvious to hard-core scripters, but it took me a bit of thinkin' to figure it out. The solution is to create a new variable that is comprised of the ssh command calling the $username variable, and then call the new variable (the entire command) in the script. Which looks a little something like this:

quota=`ssh -t root@home.account.server "edquota -p systemsboy $username"`
echo "$quota"


So we've created a variable, called $quota, which is the entire ssh command, and then we've simply called that variable in the script. That $quota variable will have the $username variable already filled in, and the command will now succeed on the remote machine. One thing that's important to note here: generally the command being sent over ssh is enclosed in single-quotes. In this instance, however, it must be enclosed in double-quotes for the command to work. I also used the -t option in this example (which tells ssh that the session is interactive, and to wait until it's told to return to the local machine) but I don't actually think it's necessary in this case. Still, it shouldn't hurt to have it there, just in case something goes funky.

But so far nothing has gone funky. This seems to work great.

Labels: , ,

Directory Access Via the Command Line

Saturday, November 18, 2006
I recently finally had occasion to learn some incredibly handy new command-line tricks I've been wanting to figure out for some time. Namely, controlling Directory Access parameters. I've long hoped for and wondered if there was a way to do this, and some of my more ingenious readers finally confirmed that there was, in the comments to a recent article. And now, with initiative and time, I've figured it all out and want to post it here for both your and my benefit, and for the ages (or at least until Apple decides to change it).

The occasion for learning all this was a wee little problem I had with my Mac OS X clients. For some reason, which I've yet to determine, a batch of them became hopelessly unbound from the Open Directory master on our network.


Weird Client Problem: "Some" Accounts Available? Huh?
(click image for larger view)


The solution for this was to trash their DirectoryService preferences folder, and then to rebind them to the server. This was always something I'd done exclusively from the GUI, so doing it on numerous clients has always been a pain: log into the client machine, trash the prefs, navigate to and open the Directory Access application, authenticate to the DA app, enter the OD server name, authenticate for directory binding, and finally log back out. Lather, rinse, repeat per client. Blech! The command-line approach offers numerous advantages, the most obvious being that this can all be scripted and sent to multiple machines via Apple Remote Desktop. No login required, no GUI needed, and you can do every machine at once.

The command-line tools for doing all this are not exactly the most straightforward set of commands I've ever seen. But they exist, and they work, and they're quite flexible once you parse them out. The first basic thing you need to understand is that there are two tools for accomplishing the above: dscl and dsconfigldap. The dsconfigldap command is used to add an LDAP server configuration to Directory Access. The dscl command adds that server to the Authentication and Contacts lists in Directory Access, and is used to configure the options for service access.

So typically, your first step in binding a client to an OD master in Directory Access is to add it to the list of LDAPv3 servers. This can be done via the command-line with dsconfigldap, like so:

sudo dsconfigldap -s -a systemsboy.com -n "systemsboy"


We like to use directory binding in our configuration, and this can be accomplished too:

sudo dsconfigldap -u diradmin -i -s -f -a systemsboy.com -c systemsboy -n "systemsboy"


The above command requires a directory administrator username and interactively requests a password for said user. But if you want to use ARD for all of this, you'll need to supply the password in the command itself:

sudo dsconfigldap -u diradmin -p 'DirectoryAdmin_Password' -s -f -a systemsboy.com -c systemsboy -n "systemsboy"


Directory Access: Adding an OD Server Configuration
(click image for larger view)


So, there you have it. You've now added your OD master to your list of LDAPv3 servers. You can see this reflected immediately in the Directory Access application. But, unlike in DA, the command does not automatically populate the Authentication and Contacts fields. Your client will not authenticate to the OD master until you have added the OD server as an authentication source. To do this you use dscl. You'll need a custom Search Path for this to work. You may already have one, but if you don't you can add one first:

dscl -q localhost -create /Search SearchPolicy dsAttrTypeStandard:CSPSearchPath


And now add the OD master to the Authentication search path you just created:

sudo dscl -q localhost -merge /Search CSPSearchPath /LDAPv3/systemsboy.com


Directory Access: Adding an OD Authentication Source
(click image for larger view)


If you want your OD server as a Contacts source as well, run:

sudo dscl -q localhost -merge /Contact CSPSearchPath /LDAPv3/systemsboy.com


Again, this change will be reflected immediately in the DA application. You may now want to restart Directory Services to make sure the changes get picked up, like so:

sudo killall DirectoryService


And that's really all there is to it. You should now be able to log on as a network user. To test, simply id a know network-only user:

id spaz


If you get this error:

id: spaz: no such user


Something's wrong. Try again.

If all is well, though, you'll get the user information for that user:

uid=503(spaz) gid=503(spaz) groups=503(spaz)


You should be good to go.

And, if you want to view all this via the command-line as well, here are some commands to get you started.

To list the servers in the configuration:

dscl localhost -list /LDAPv3


To list Authentication sources:

dscl -q localhost -read /Search


To list Contacts sources:

dscl -q localhost -read /Contact


A few things before I wind up. First, some notes on the syntax of these commands. For a full list of options, you should most definitely turn to the man pages for any of these commands. But I wanted to briefly talk about the basic syntax, because to my eye it's a bit confusing. Let's pick apart this command, which adds the OD master to the configuration with directory binding and a supplied directory admin username and password:

sudo dsconfigldap -u diradmin -p 'DirectoryAdmin_Password' -s -f -a systemsboy.com -c systemsboy -n "systemsboy"


The command is being run as root (sudo) and is called dsconfigldap. The -u option tells the command that we'll be supplying the name of the directory admin to be used for binding to the OD master (required for such binding). Next we supply that name, in this case diradmin. The -p option allows you to specify the password for that user, which you do next in single quotes. The -s option will set up secure authentication between server and client, which is the default in DA. The -f option turns on ("forces") directory binding. The -a option specifies that you are adding the server (as opposed to removing it). The next entry is the name of the OD server (you can use the Fully Qualified Domain Name or the IP address here, but I prefer FQDN). The -c option specifies the computer ID or name to be used for directory binding to the server, and this will add the computer to the server's Computers list. And finally, the -n option allows you to specify the configuration name in the list of servers in DA.

Now let's look at this particular use of dscl:

sudo dscl -q localhost -merge /Search CSPSearchPath /LDAPv3/systemsboy.com


Again, dscl is the command and it's being run as root. The -q option runs the command in quiet mode, with no interactive prompt. (The dscl command can also be run interactively.) The localhost field specifies the client machine to run the command on, in this case, the machine I'm on right now. The -merge flag tells dscl that we want to add this data without affecting any of the other entries in the path. The /Search string specifies the path to the Directory Service datasource to operate on, in this case the "Search" path, and the CSPSearchPath is our custom search path key to which we want to add our OD server, which is named in the last string in the command.

Whew! It's a lot, I know. But the beauty is that dscl and dsconfigldap are extremely flexible and powerful tools that allow you to manipulate every parameter in the Directory Access application. Wonderful!

Next, to be thorough, I thought I'd provide the commands to reverse all this — to remove the OD master from DA entirely. So, working backwards, to remove the server from the list of Authentication sources, run:

sudo dscl -q localhost -delete /Search CSPSearchPath /LDAPv3/systemsboy.com


To remove it from the from the Contacts source list:

sudo dscl -q localhost -delete /Contact CSPSearchPath /LDAPv3/systemsboy.com


And to remove a directory-bound configuration non-interactively (i.e. supplying the directory admin name and password):

sudo dsconfigldap -u diradmin -p 'DirectoryAdmin_Password' -s -f -r systemsboy.com -c systemsboy -n "systemsboy"


If that's your only server, you should be back to spec. Just to be safe, restart DirectoryService again:

sudo killall DirectoryService


If you have a bunch of servers in your Directory Access list, you could script a method for removing them all with the above commands, but it's probably easier to just trash the DirectoryService prefs (in /Library/Preferences) and restart DirectoryService.

Lastly, I'd like to end this article with thanks. Learning all this was kind of tricky for me, and I had a lot of help from a few sources. Faithful readers MatX and Nigel (of mind the explanatory gap fame) both pointed out the availability of all this command-line goodness. And nigel got me started down the road to understanding it all. Most of the information in this article was also directly gleaned from another site hosted in my home state of Ohio, on a page written by a Jeff McCune. With the exception of a minor tweak here and there (particularly when adding Contacts sources), Jeff's instructions were my key to truly understanding all this, and I must thank him profusely. He made the learning curve on all this tolerable.

So thanks guys! It's help like this that makes having this site so damn useful sometimes, and it's much appreciated.

And now I'm off to go bind some clients command-line style!

UPDATE:
Got to test all this out real-world style today. Our server got hung up again, and we had the same problem I described at the head of this article. No one could log in. So I started trying to use the command-line to reset the machines. I had one major snag that caused it all to fail until I figured out what was going on. Seems I could not bind my machines to the server using the -s flag (secure binding). I had thought that this was the default, and that I was using it before, but now I'm not so sure. In any case, if you're having trouble binding or unbinding clients to a server, try the dsconfigldap command without the -s flag if you can, like so:

sudo dsconfigldap -u diradmin -p 'DirectoryAdmin_Password' -f -a systemsboy.com -c systemsboy -n "systemsboy"

That's what worked for me. I'm a little concerned that this is indicative of a problem on my server, but now's not really the time to go screwing with stuff, so I'll leave it alone for the time being.

This update brought to you by the little letter -s.

Labels: , ,

External Network Unification Part 4: The CMS Goes Live

Monday, October 09, 2006
NOTE: This is the latest article in the External Network Unification project series. It was actually penned, and was meant to be posted several weeks ago, but somehow got lost in the shuffle. In any case, it's still relavant, and rather than rewrite it accounting for the time lapse, I present it here in it's original form, with a follow-up at the end.
-systemsboy

Last Thursday, August 10th, 2006 marked a milestone in the External Network Unification project: We've migrated our CMS to Joomla and are using external authentication for the site. Though it was accomplished somewhat differently than I had anticipated, accomplished it was, nonetheless, and boy we're happy. Here's the scoop.

Last time I mentioned I'd built a test site — a copy of our CMS on a different machine — and had some success, and that the next step was to build a test site on the web server itself and test the LDAP Hack on the live server authenticating to a real live, non-Mac OSX LDAP server. Which is what I did.

Building the Joomla port on the web server was about as easy as it was on the test server. I just followed the same set of steps and was done in no time. Easy. And this time I didn't have to worry about recreating any of the MySQL databases since, on the web server, they were already in place as we want them and were working perfectly. So the live Joomla port was exceedingly simple.

LDAP, on the other hand, is not. I've been spoiled by Mac OS X's presentation of LDAP in its server software. Apple has done a fantastic job of simplifying what, I recently discovered, is a very complicated, and at times almost primitive, database system. Red Hat has also made ambitious forays into the LDAP server arena, and I look forward to trying out their offerings. This time out my LDAP server was built by another staff systems admin. He did a great job in a short space of time on what I can only imagine was, at times, a trying chore. The LDAP server he built, though, worked and was, by all standards, quite secure. Maybe too secure.

When trying to authenticate our Joomla CMS port with the LDAP hack, nothing I did worked. And I tried everything. Our LDAP server does everything over TLS for security, and requires all transactions to be encrypted, and I'm guessing that the LDAP Hack we were using for the CMS just couldn't handle that. In some configurations login information was actually printed directly to the browser window. Not cool!

Near the point of giving up, I thought I'd just try some other stuff while I had this port on hand. The LDAP Hack can authenticate via two other sources, actually: IMAP and POP. Got a mail server? The LDAP Hack can authenticate to it just like your mail client does. I figured it was worth a shot, so I tried it. And it worked! Perfectly! And this gave me ideas.

The more I thought about it, the more I realized that our LDAP solution is nowhere near ready for prime-time. I still believe LDAP will ultimately be the way to go for our user databases. But for now what we want to do with it is just too complicated. The mere act of user creation on the LDAP server, as it's built now anyway, will require some kind of scripting solution. I also now realize that we will most likely need a custom schema for the LDAP server, as it will be hosting authentication and user info for a variety of other servers. For instance, we have a Quicktime Streaming Server, and home accounts reside in a specific directory on that machine. But on our mail server, the home account location is different. This, if I am thinking about it correctly, will need to be handled by some sort of custom LDAP schema that can supply variable data with regards to home account locations based on the machine that is connecting to it. There are other problems too. Ones that are so abstract to me right now I can't even begin to think about writing about them. Suffice to say, with about two-and-a-half solid weeks before school starts, and a whole list of other projects that must get done in that time frame, I just know we won't have time to build and test specialized LDAP schemas. To do this right, we need more time.

By the same token, I'm still stuck — fixated, even — on the idea of reducing as many of the authentication servers and databases, and thus a good deal of the confusion, as I possibly can. Authenticating to our mail server may just be the ticket, if only temporarily.

The mail server, it turns out, already hosts authentication for a couple other servers. And it can — and is now — hosting authentication for our CMS. That leaves only two other systems independently hosting user data on the external network: the reservations system (running on it's own MySQL user database) and the Quicktime Streaming server, which hosts local Netinfo accounts. Reservations is a foregone conclusion for now. It's a custom system, and we won't have time to change it before the semester starts. (Though it occurs to me that it might be possible for Reservations to piggyback on the CMS and use the CMS's MySQL database for authentication — which of course now uses the mail server to build itself — rather than the separate MySQL database it currently uses. But this will take some effort.) But if I can get the Quicktime Streaming Server to authenticate to the mail server — and I'm pretty hopeful here — I can reduce the number of authentication systems by one more. This would effectively reduce by more than half the total number of authentication systems (both internal ones — which are now all hosted by a Mac OS X server — and external ones) currently in use.

Right now — as of Thursday, August 10th, 2006 — we've gone live with the new CMS, and that brings our total number from eight authentication systems down to four. That's half what we had. That awesome. If I can get it down to three, I'll be pleased as punch. If I can get it down to two, I'll feel like a super hero. So in the next couple weeks I'll be looking at authenticating our Quicktime server via NIS. I've never done it, but I think it's possible, either through the NIS plugin in Directory Access, or by using a cron-activated shell script. But if not, we're still in better shape than we were.

Presenting the new system to the users this year should be far simpler than it's ever been, and new user creation should be a comparative cakewalk to years past. And hopefully by next year we can make it even simpler.

FOLLOW-UP:
It's been several weeks since I wrote this article, and I'm happy to report that all is well with our Joomla port and the hack that allows us to use our mail server for authentication. It's been running fine, and has given us no problems whatsoever. With the start of the semester slamming us like a sumo wrestler on crack, I have not had a chance to test any other servers against alternative authentication methods. There's been way too much going on, from heat waves to air conditioning and power failures. It's been a madhouse around here, I tell ya. A madhouse! So for now, this project is on hold until we can get some free time. Hopefully we can pick up with it again when things settle, but that may not be until next summer. In any case, the system we have now is worlds better than what we had just a few short months ago. And presenting it to the users was clearer than it's ever been. I have to say, I'm pretty pleased with how it's turing out.

Labels: , , , ,

Three Platforms, One Server Part 12: AFP Network Home Accounts

Monday, September 25, 2006
I hit another minor but infuriating snag in my plan to unify the network, though this one was all Apple. It's another case of Apple making serious changes to the way you're supposed to set your server and clients and never really trumpeting much about it. Seems everything I used to do with my server and clients is done either slightly — or in some cases radically — differently in Tiger than it was in Panther. I must admit, I never checked the manuals on this, but something as simple setting up AFP networked home accounts has become a much more complex process in Tiger than it ever was in Panther, and it took me quite a while to figure out what I had to do to make it work like it did in the Panther glory days.

Now, to remind, we don't really use AFP networked home accounts for most users. Our users' home accounts live on an NFS server — a separate machine from our authentication server — which is auto-mounted on each client at boot. The only value the authentication server stores for most users' home accounts is where those home accounts can be found on the client machines, which in our case is /home. So I haven't had to worry too much about AFP network home accounts. Until last week.

There is one exception to the above standard. Certain Macromedia products do not function properly when the user's home account is located on our NFS server, for some reason. In particular, Flash is unable to read the publishing templates, effectively disabling HTML publishing from the app. This has been a long term problem and has affected every version of Flash since we moved to our NFS home account server almost three years ago. Our solution has been to create a special user — the FlashUser — whose home account lives in an AFP network home account. When people need to work with Flash, they are encouraged to use this FlashUser account so that they can use the publishing features. This is inconvenient, but it works and we're used to it, so we keep doing it until we find a better solution. Unfortunately, when I built my master authentication server (actually, when I rebuilt it) I forgot to add the FlashUser. The teacher of the Flash class eventually came to my office and asked about the account, and I told him it should just take a minute or two to get it set up. Boy was I wrong.

The FlashUser account was always a simple AFP network user account. The user's account information and actual home account data were both stored on the same server, the data shared via an AFP share point, and configured in Workgroup Manager's "Sharing" pane as an auto-mounted home folder. According to this article guest access must be enabled on the AFP share to auto-mount. Well, that's new in 10.4, and I had no idea. And beyond that, I think it sucks. Why should guest access be enabled on a home account share point? This didn't used to be the case, and it seems way less secure to me in that by doing this you open the entire AFP home account share to unauthenticated access. Bad. Why in the hell would they change this? Not only is it less secure, but it breaks with tradition in ways that could (and in my cases did) cause serious headaches for admins setting up AFP networks home accounts.

Fortunately, after many hours of trial and error, I discovered a way to accomplish the same thing without enabling guest access on the share. It is possible, but it's quite a pain. Nevertheless, it's what I did.

Guest access can be foregone if trusted directory binding is set up between the client and the computer (which still makes no sense to me. You either have to go totally insecure, or set up an insanely secure system. Seems like we could skip the trusted binding thing if you'd just let us set up the shares sans guest access like we used to do.) Trusted binding is a bit of a pain to set up in that, as far as I know at this point, the only way to set it up is to go to every machine, log in, and run the Directory Access application. Apple really, really, really needs to give us admins some command-line tools for controlling DA. The current set is paltry at best, though I do need to look and see if there is one for setting up client-server binding (there might be, in fact it might be called dsconfigladp though this tool can not be used for setting authentication sources, for some ungodly reason, and I have yet to try it for the purposes of directory binding). But before you set up your clients, you must be sure "Enable Directory Binding" on your server is checked in the Server Admin application. By default it's not. And, at least in my case, after enabling directory binding, I had to restart my server. Fun stuff. Also, I'm fairly certain this requires a properly functioning Kerberos setup on the server, so if you're just starting out, be sure to get Kerberos running right.


Directory Access: Enable Directory Binding
(click image for larger view)


Next you need to go to your client machines one by one and bind them to the server. If you've already joined your clients to a server for authentication, you can simply navigate to the server configuration in DA, click "Edit..." to edit it, and you'll be presented with a "Bind..." button that will walk you through the process. If you haven't yet joined a client you will be asked to set up trusted directory binding when you do. From there you need to enter the hostname of the client machine, the name of a directory administrator on your server, and that user's password. In my case, I needed to also reboot the client machine. Like I said, kind of a pain.


Directory Access: Configure LDAP
(click image for larger view)


Directory Access: Edit Server Config
(click image for larger view)


Directory Access: Hit "Bind..." to Set Up Trusted Directory Binding

(click image for larger view)


But that's it. You're done. (Well, 25 computers later, that is.) I now have my FlashUser set up again, and auto-mounting its home account in the usual way (none of that "Guest Access" shit), albeit with considerably more effort than it took in Panther. This is, in my opinion, just one more reason to hate Tiger, which I generally do, as long-term readers are well aware. It's another case in which Tiger has gotten harder and more complicated to use and set up, with no apparent advantage, or at least no immediate one.

I can only hope this is going somewhere good, because from my perspective the basic things I've come to rely on in both Mac OS X Server and Client (can you say "search by name?") have gotten harder to do in Tiger. Significantly harder. And that's too bad, 'cause that's just not what I'm looking for from Apple products. If I wanted something difficult to use, I'd switch to Linux. (I'd never switch to Windows.) And if Apple software continues along its current trajectory — the Tiger trend towards a more difficult OS — and Linux software continues along its current trend towards easier software, you may see more Linux switchers than ever. Apple's draw is ease-of-use. The more they move away from that idea in the implementation of their software, the less appealing they become, to me personally, as a computing platform, and the less distinguishable they become from their competitors.

But for now, I'm sticking by my favorite computer platform. Panther was an amazing OS — it truly "just worked". It's kind of sad that Tiger has been the OS that's made start considering, however peripherally, other options. Here's hoping they do better with Leopard.

BTW, here are a couple more links of interest regarding the topic of AFP newtork home accounts in Tiger. I don't have time to read them right now, but they may prove interesting at some point.

Creating a Home Directory for a Local User at a Server
Creating a Custom Home Directory
Automatically Mounting Share Points for Clients
Setting Up an Automountable AFP Share Point for Home Directories

UPDATE:
A fellow SysAdmin and blogger, Nigel, from mind the explanatory gap (one of my systems faves) has some beefs with this article, and shares some of his own experiences which are quite contrary to what I've reported. Just to be clear, this article reflects my own experiences, and there's a bit more to my own scenario than I shared in the article, mainly because I didn't think the details were important. They may be, and I discuss it at greater length in my response to Nigel's comment. Thanks, Nigel, for keeping me on my toes on this one.

I'm not really sure what's going on here, but if I get to the bottom of it, I'll certainly report about it, either here or in a follow up post. But please read the comments for the full story, as there's really a lot missing in the article, and things start to get clearer in the comments.

Labels: , , , , , ,

Three Platforms, One Server Part 11: From the BDC to the lookupd

Thursday, September 07, 2006
Well, I did not have time to test my replica on Windows clients. I did, however, set up my BDC (Backup Domain Controller) on said replica and re-bind my Windows clients to the new master server once the replica was in place. Oddly, after doing so, Windows logins got a bit sketchy: sometimes they worked, sometimes not. I just figured it was a fluke and would go away. (Yes, that's my version of the scientific method. But that's the suck thing about intermittent problems. Very hard to track, or even — as in this case — be sure they exist.) Anyway, today the Windows login flakiness persisted, and was starting to really be a problem. So I investigated. A good friend and colleague recommended I check Windows' Event Manager (which I did not know about — hey, I'm still new at Windows — until today). There I saw messages that referenced problems connecting to the replica, which shouldn't have been happening. Thinking this might have something to do with the login problems, I turned off Windows services on the replica. Sure enough, Windows logins immediately began working perfectly. I had only two Windows services running on the replica: the BDC, which is supposed to provide domain controller failover should the PDC (the Primary Domain Controller on the master server) cease to function; and Windows file sharing, which hosts a backup of our Windows roaming profile drive. I'm not sure which service caused the problem as I simply stopped all services. So when I get a chance I will test each service individually and see which is the culprit. Hopefully it's the file sharing, because if we can at least keep the BDC running, we have some authentication failover: in the event of a master failure, users would still be able to log in, though their roaming profiles would be temporarily unavailable. If it's the BDC causing problems, then we effectively have no failover for Windows systems, which would blow big, shiny, green chunks. If that's the case, I give up. Yup, you heard me. I give up. With no clues, failing patience, a serious lack of time, and no good time to test it, I'd pretty much be giving up on the BDC, at least until I got some better info or until the winter break. Or both. For all I know, this is a bug in Tiger Server.

On the plus side, I was able to observe some good behavior for a change on my Mac clients. In the last article I'd mentioned that it's the clients that are responsible for keeping track of the master and replica servers, and that they get this info from the master when they bind to it, and that this info was probably refreshed automatically from time to. Well, this does indeed seem to be the case. Mac clients do periodically pull new replica info from the master, as evidenced by the presence of the replica in the DSLDAPv3PlugInConfig.plist file where once none existed, and on machines I'd not rebound. Nice. Guess I won't be needing to rebind the Mac clients after all. For those interested in theories, I believe this gets taken care of by lookupd. If I understand things correctly, lookupd manages directory services in Mac OS X, particularly the caches for those services. Mac OS X caches everything, and in Mac OS X, even Directory Service settings are cached. DNS. NetInfo. SMB, BSD, NIS. All cached. Most of these caches — like DNS, for example — have pretty short life spans. But some services don't need refreshing so often. Things like Open Directory services stay in cache for a bit longer. There's even a way to check and set the time-to-live for various service caches, but I'm not quite there yet. But I believe it's lookupd that grabbed the new settings from the server, or at least expired the cache that tells the client to go get those settings. In any case, there's a lookupd command I've found increasingly handy if you've just made changes to certain settings and they're not yet active on your system:

sudo lookupd -flushcache

This will, obviously, flush the lookupd cache, and refresh certain settings. For instance, DNS changes sometimes take a bit of time to become active. This command will take care of that lag. My favorite use, though, is on my server. See, when I create a new OD user, I use the command dscl. Apparently, using the Workgroup Manger GUI will flush the cache, and the user will be instantly recognized by the system. Smart. But if, like me, you use a script that calls dscl to add or remove an OD user (remember, OD users are managed by a directory service, as are local NetInfo users, for that matter), the system won't become aware of said user until the cache is flushed. I used to add a new user, id them, and sometimes get nothing for the first few minutes. Or freakier, delete a user and still be able to id them in the shell. Until I found out more about lookupd I thought I was going crazy. Now I just know to include the above command in my AddUser and DeleteUser scripts. Nice. Nicer still to know I'm not losing my mind. At least not in the case of adding or removing users.

Anyway, when I get 'round to my final Windows services tests, I will post an update.

God, I'm sick of this replica shit.

Labels: , , , , , ,