The Adventures of Systems Boy!

Confessions of a Mac SysAdmin...

NetBoot Part 5

Friday, April 11, 2008
So far this NetBoot/NetInstall thing is working out a thousand times better than I ever thought it would. I wish I'd done this years ago. Not only does it save time, it also reduces errors. This is often one of the most overlooked features of automating a process: the less human interaction in the process, the fewer mistakes can be made. I have only to compare the set of instructions I gave to last year's crew for building a new system to the instructions for using the new NetInstall system to see evidence of this truism. The list of human actions to take — and, thus, potentially screw up — is significantly shorter using the new process. And that's a beautiful thing.

At this point I've converted about half the staff to Leopard with the NetInstall system, and for the most part it's been quick and painless for both me and them. Contrast with years past, where upgrading staff computers — which are both the most customized, and the most important to preserve the data of — has been fraught with tension and minor hiccups. This year I almost feel like I've forgotten something, it's been so easy. But staff would surely let me know if there were problems. (I'm so knocking wood right now.)

I've also had an opportunity to test building multiple machines simultaneously. Yesterday I built five Macs at the same time, and, amazingly, all five built in about the same time it takes to build one — about a half an hour. I'm astounded. We should be able to build our new lab workstations this summer in a day. And still have time for a long lunch. And for the most part I'll be able to offload that job to my assistants.

As I finish up the system, I've realized some things. First of all, it sort of reminds me of software development — or at least what I imagine software development to be like — because I'm building little tiny components that all add up to a big giant working whole. Also, as I write components, I find myself able to reuse them, or repurpose them for certain, specific scenarios. So, in a sense, the more I build, the easier the building becomes, as I imagine is true in software development. Organization is also key. I find myself with two repositories: one contains the "build versions" — all the resources needed to build the packages — and one contains the finished products — the packages themselves — organized into something resembling the physical organization (packages for staff computers in one area, packages for workstations in another, for instance). It's shockingly fascinating to work on something like this, something that's built from tiny building blocks and that relies very heavily on good organization. I'm really enjoying it so far, and I'm a little sad that the groundwork is built and it's nearly done. There's just something fundamentally satisfying about building a solid infrastructure. I guess that's just something I innately like about my job.

The next step in this process, as I've alluded, will be to do a major build, i.e. our new batch of workstations when they come in the summer, and an update of all our existing computers — all-in-all about 40 machines. Between now and then there are sure to be some updates, so I'll probably update my base config before we do the rest of the lab. And then will come the fun. I will report back with all the juicy details when that happens, in what will probably be the final installment of this series.

See you in summertime!

Labels: , , , , ,

NetBoot Part 4

Monday, March 31, 2008
So this is going great. I have a really solid Base OS Install, and a whole buttload of packages now. Packages that set everything from network settings to custom and specialized users. I can build a typical system in about 45 minutes, and I can do most of the building from my office (or any other computer in the lab that has ARD installed).

I'm also getting fairly adept at making packages. A good many of my packages are just scripts that make settings to the system, so I'm getting pretty handy with the bash and quite intimate with dscl. But, perhaps most importantly, I'm learning how to make all sorts of settings in Leopard via the command-line that I never knew how to do.

The toughest one so far has been file sharing. In our lab we share all our Work partitions to the entire internal network over AFP and SMB. In the past we used SharePoints to modify the NetInfo database to do so, but this functionality has all been moved over to Directory Services. To complicate matters, SAMBA no longer relies simply on standard SMB configuration files in standard locations, and the starting and stopping of the SMB daemon is handled completely by launchd. So figuring this all out has been a headache. But I think I've got it!

Setting Up AFP
Our first step in this process is setting up the share point for AFP (AppleFileshareProtocol) sharing. This wasn't terribly difficult to figure out, especially now that I've been using Directory Services to create new users. To create an AFP share in Leopard, you use dscl. Once you grok the syntax of dscl it's fairly easy to use. It basically goes like this:
command node -action Data/Source value


The "Data Source" is the thing you're actually operating on. I like to think of it as a plist entry in the database — like a hierarchically structured file — which it basically is, or sometimes I envision the old-style NetInfo structures. To get the needed values for my new share, I used dscl to look at a test share I'd created in the Sharing Preferences:
dscl . -read SharePoints/TEST


The output looked like this:
dsAttrTypeNative:afp_guestaccess: 1
dsAttrTypeNative:afp_name: TEST
dsAttrTypeNative:afp_shared: 1
dsAttrTypeNative:directory_path: /Volumes/TEST
dsAttrTypeNative:ftp_name: TEST
dsAttrTypeNative:sharepoint_group_id: XXXXXXXX-XXXX-XXXX-XXXX-XXXXXXXXXXX
dsAttrTypeNative:smb_createmask: 644
dsAttrTypeNative:smb_directorymask: 755
dsAttrTypeNative:smb_guestaccess: 1
dsAttrTypeNative:smb_name: TEST
dsAttrTypeNative:smb_shared: 1
AppleMetaNodeLocation: /Local/Default
RecordName: TEST
RecordType: dsRecTypeStandard:SharePoints


Okay. So I needed to use dscl to create a record in the SharePoints data source with all these values. Fortunately, the "sharepoint_group_id" is not required for the share to work, because I'm not yet sure how to generate that number. But create the share with all the other values and you should be okay:
sudo dscl . -create SharePoints/my-share
sudo dscl . -create SharePoints/my-share afp_guestaccess 1
sudo dscl . -create SharePoints/my-share afp_name My-Share
sudo dscl . -create SharePoints/my-share afp_shared 1
sudo dscl . -create SharePoints/my-share directory_path /Volumes/HardDrive
sudo dscl . -create SharePoints/my-share ftp_name my-share
sudo dscl . -create SharePoints/my-share smb_createmask 644
sudo dscl . -create SharePoints/my-share smb_directorymask 755
sudo dscl . -create SharePoints/my-share smb_guestaccess 1
sudo dscl . -create SharePoints/my-share smb_name my-share
sudo dscl . -create SharePoints/my-share smb_shared 1


This series of commands will create a share called "My-Share" out of the drive called "HardDrive."

After modifying the Directory Services database, it's always smart to restart it:
sudo killall DirectoryService


And we need to make sure AFP is running by starting the daemon and reloading the associated Launch Daemons:
sudo AppleFileServer
sudo launchctl unload /System/Library/LaunchDaemons/com.apple.AppleFileServer.plist
sudo launchctl load -F /System/Library/LaunchDaemons/com.apple.AppleFileServer.plist


Not the easiest process, but not too bad. SMB was much tougher to figure out.

Setting Up SMB
Setting up SMB works similarly, but everything is in a completely different and not-necessarily standard place. To wit, Leopard has two different smb.conf files: one that's auto-generated (and which you should not touch) in /var/db, and one in the standard /etc location. Fortunately, it turned out, I didn't have to modify either of these. But still, it led to some confusion. The way SMB is managed in Leopard is rather roundabout and interdependent. Information about SMB share is stored in flat files — one per share — in /var/samba/shares. So, to create our "my-share" share, we need a file named for the share (but all lower-case):
sudo touch /var/samba/shares/my-share


And in that file we need some basic SMB info to describe the share:
#VERSION 3
path=/Volumes/HardDrive
comment=HardDrive
usershare_acl=S-1-1-0:F
guest ok=yes
directory mask=755
create mask=644


Next — and this was the tough part to figure out — we need to modify one, single, very important preference file that basically informs Launch Services that SMB should now be running:
sudo defaults write /Library/Preferences/SystemConfiguration/com.apple.smb.server "EnabledServices" '(disk)'

This command modifies the file com.apple.smb.server.plist in our /Library/Preferences/SystemConfiguration folder. That file is watched by launchd such that when it is modified thusly, launchd knows to start and run the smbd daemon in the appropriate fashion. Still, for good measure, I like to reload the LaunchDaemon for the SMB server by hand. Don't need to, but it's a nice idea:
sudo launchctl unload /System/Library/LaunchDaemons/com.apple.smb.server.preferences.plist
sudo launchctl load -F /System/Library/LaunchDaemons/com.apple.smb.server.preferences.plist


That's pretty much it! There are a few oddities: For one, the new share will not initially appear in the Sharing Preferences pane, nor will the Finder show it as a Shared Folder when you open the window.


Shared Folder: This Won't Show Without a Reboot
(click image for larger view)


But the share will be active, and all will be right with the world after a simple reboot. (Isn't it always!) Also, if you haven't done it already, you may have to set permissions on your share using chmod in order for anyone to see it.

I was kind of surprised at how hard it was to set up file sharing via the command-line. But I'm glad I stuck with it and figured it out. It's good knowledge to have.

Hopefully someone else will find it useful as well.

Labels: , , , , ,

NetBoot Part 3

I've become quite the package whiz, if I do say so myself. Actually, I'm probably doing something ass-backwards, but still, I wanted to share some of my working methods as they seem to be, well... Um... Working...

One of the things I'm doing is using packages to run shell scripts that make computer settings (like network settings and user-creation) rather than actually installing files.


PackageMaker: I Prefer the 10.4 Version of Packages
(click image for larger view)


This can be done in PackageMaker by taking some creative liberties with preflight and/or postflight scripts. The only hitch is that PackageMaker insists that you install at least some files onto the target system.


PackageMaker: Installing Scripts to /tmp
(click image for larger view)


So the majority of my packages contain only a single script. That script first gets installed to /tmp, thus fulfilling PackageMaker's "must install files" directive.


PackageMaker: A Postflight Script
(click image for larger view)


The script then runs as a posflight script, and the last line of the script deletes the instance of the script in /tmp, just for good measure.


Shell Script: Removing the Script from /tmp
(click image for larger view)


It could be argued that there's no reason to create packages from scripts, that you could just as easily run the scripts directly in ASR, but packages offer a couple of advantages. For one, packages leave receipts, so it's easy to check and see if something's been set on a computer. For two, packages are easy to deal with; assistants and other SysAdmins know how they work and can easily understand how to use them. Need to change a machine's settings? Don't run a script. Hell, don't even bother opening System Preferences. Just open and run a package. What could be easier (and less error-prone, I might add)? From an ease-of-use perspective, packages have a huge advantage. And ease-of-use adds efficiency. Which is why I not-so-suddenly find myself in the envious position of being able to build systems in about half the time (or less!) it used to take. That's a huge improvement!

Using this method (and sound DNS) I've been able to write packages that configure network settings, create computer-specific users, set custom disk and file permissions, set up autofs, bind to our authentication server and set up SSH for password-less login.

Next on the list: File Sharing!

Should be fun.

Labels: , , , , ,

Secondary DNS Configuration

Thursday, February 21, 2008
I recently had occasion to do some Mac OS X DNS configuration. Primary DNS setup is pretty straightforward, but I always get stuck on the secondary DNS config, and this week I had the (not so) rare privilege of discovering I'd been doing it wrong all along. I thought I'd post some quickie instructions for next time this comes up.

So, to set up your Mac OS X Server as a secondary DNS server (that is, if the primary goes down, this one will act as a failover), you'll need to open Server Admin and navigate to the DNS section (we'll use the 10.4 version, but the basic gist is the same in 10.5). Next, add a secondary zone under "Secondary Zones." This first one will be for your forward lookups. In the first field add the full name of your zone. In the second field add the IP address of your primary DNS server. It should look like this:


Secondary DNS: Forward Lookups
(click image for larger view)


Now add another secondary zone for the reverse lookups. This is exactly the same except that instead of the zone name in the first field, you'll use the reverse zone information. It looks like this:


Secondary DNS: Reverse Lookups
(click image for larger view)


Note that the reverse IP in the field should cover the zone IP range. That is, if your primary DNS server covers "192.168.1" zone, you'll enter the reverse info for that range. If your primary DNS covers all of "192.168" (notice the truncated IP number) then you should enter that. All together it should look like this:


Secondary DNS: All Together Now
(click image for larger view)

Once this is all set up and saved, you can start the service. You can tell it worked by listing the contents of /var/named. You should see two new files, one called your.domain.com.bak and one called your.IP.in-addr.arpa.bak. And these should be populated with the same DNS info as your primary.

And that's it! Enter the new secondary DNS server info in your Network System Preferences, just after the primary, and if your main DNS fails you'll be covered.

Oh, almost forgot, thanks to this dude for helping me figure all this out.

Labels: , ,

NetBoot Part 2

Wednesday, February 13, 2008
So here's the plan, as it stands right now. (Yes, I have a plan already! Yes, that was quick.) First, build an image that's good for all workstations (laptops, staff machines, standard workstations, etc.) throughout the lab with:
  • Base OS (Mac OS X Leopard 10.5)
  • A DHCP network connection
  • Apple applications
  • Adobe applications
  • Drag-and-drop applications
  • Other third-party applications
  • One admin user
  • ARD active

IMAGE THIS SYSTEM
This becomes the base system build, the Master Image — the replacement system if a machine ever needs rebuilding. It is the only full system image. There is only one.

Everything else that is machine-type specific — that is, users, applications, application components, crontabs, anything — gets turned into and installed via either a downloaded or hand-rolled package. So far I've been using Apple's PackageMaker, which has matured a great deal since last I tried it. It's pretty nice. I'm also taking a look at Iceberg, which also looks to be pretty full-featured and nifty.


Iceberg: by White Box
(click image for larger view)


PackageMaker: by Apple
(click image for larger view)

These packages can be machine-type specific and stored in a simple folder hierarchy by machine type — laptop packages in the laptops folder, etc. — for organizational purposes. In addition to being machine-type specific, packages can also, I believe, be machine specific. That is, I think we can make settings like computer name and network settings using packages as well. So what we're talking about here is a system of computer building that happens completely over the network, and that can be directed almost entirely from one ARD-toting computer, that computer being mine, of course. (I've always said, the sign of a good SysAdmin is that he never leaves his chair.)

I've gotten pretty good at making application packages, at this point (not that it's terribly hard, mind you). My next step will be to learn how to make system settings with packages as well. My other next step is going to be, of course, creating the Master Build. None of this building happens 'til summer. But still, something tells me it's going to be smart to start this process now and see what crops up over the next couple of months.

As usual, I'll be reporting any new and/or interesting developments.

Oh, and thanks to everyone who commented on the last post. The comments were extremely useful!

Labels: , , , ,

Tiger Hates Leopard

Tuesday, February 12, 2008
So I'm sitting in my office, waiting for the Mac OS X 10.5.2 Leopard update to show up in my Software Update, and it just isn't happening. And at some point I realize, "Hey, maybe it just hasn't been downloaded to our Software Update Server yet." Yes, we run our very own Software Update Server under Mac OS X Server 10.4. It's super cool. It downloads all Apple updates to itself, and then any Mac in our lab can get all the Software Updates from our own internal server, rather than Apple's, which just saves gobs of time and bandwidth. Oh, we love it. But there appears to be a catch: Tiger Server will not download Leopard updates.

So I'm sitting there waiting, like, forever. And the 10.5.2 update never shows. Nor does the Leopard Graphics Update, or the HP Printer Drivers Update, and I'm all like, "Dude, what the fuck?" When all of a sudden the iLife Support Update does show up.

And that's when it hits me: Tiger totally hates Leopard.

But that's okay, 'cause Tiger's a total bitch.

In any case, I'm not sure if the converse is true — if Leopard Server will fail to download and serve Tiger updates — but if it is, good luck running a Software Update Server in a mixed Tiger/Leopard environment. Geez! You'd think Apple's software would be more compatible with, um... itself!

Highly annoying.

Oh, and by the way, after removing my Leopard box from the SUServer client list, these commands got me back in business without a restart:
sudo killall DirectoryService
sudo dscacheutil -flushcache


Just so you know.

UPDATE:
It would appear that Leopard's Software Update Server is a bit less finicky when it comes to older updates, for previous versions of the OS. Hmmm... Do you get the feeling Apple's trying to tell us something? (You know, like, "Upgrade your server." Or something.)


Leopard Software Update Server: Backwards Compatible
(click image for larger view)

Labels: , , ,

NetBoot Part 1

Friday, February 08, 2008
My big, fat, self-assigned new project — or, as I like to call it, the bug up my butt — is system roll-outs. That is, I realized at some point two things. One, I am managing way more computers than ever before, and way more than I realized; and two, the scope and variety of these various systems has become increasingly wide. These realizations inevitably brought me crashing, headlong (yes, headlong) into a third and final revelation: I need to come up with a better system for managing machine builds and systems roll-outs.

Enter: NetBoot.

Actually, let me first explain how we've handled this in the past. When I began this job we had maybe 15-20 Macs running OS 9 briefly, and then OS X since about its inception. Mac OS 9 was notoriously easy to build. Just copy that shit and be done with it. But Mac OS X was a different beast entirely. Mac OS X was complicated. Moody. A tougher nut to crack. Mac OS X required me to delve into the dark arts of system cloning.

Cue thunder clap, scary music.

The process that eventually evolved was cloning over firewire. We'd build our master machine — a basic Mac OS install with all the latest updates and our requisite software — and then clone that to the other machines over firewire, with clients booted into our Master via firewire target disk mode. This was a quick and dirty way to build a bunch of systems. Once the group was built we could customize machines or groups of machines as we saw fit. For a lab of 15-20 Macs this has worked swimmingly. But our lab has grown slowly and steadily, and completely without my realizing it.

My latest count shows our lab at more like 50 Macs now. We've added a bunch of stuff: laptops, servers, more A/Vmachines of various configurations, a render farm, and of course more workstations. Using our old system of firewire cloning is becoming increasingly clumsy, slow and error-prone. We need a better way of doing things.

Okay, now. Enter: NetBoot!


Leopard's NetBoot Interface
(click image for larger view)


NetBoot is Mac OS X Server technology that allows for centralized storage of and access to system images for installation over the network. The way it works is this: You build a system, trick it out, make it perfect — this is your Master System. Put it on a firewire drive or something transportable, because you can't be booted from your Master System for the next series of steps — imaging. Run the application called System Image Utility, that comes with Mac OS X Server's server tools, and create a NetInstall image from your Master System. Load that image onto your server and enable it in the NetBoot settings in Server Admin. And what happens next is something akin to magic (unless you use Linux, and then it's pretty par for the course, I guess.)


The Network Boot Volume: So That's What It's For!
(click image for larger view)


With your NetInstall image enabled on your server, go to any client system and open the Startup Disk Preferences. Where you'd normally see the "Network Startup" icon (I'll bet you always wondered what that was for), you'll now get something a bit more descriptive. You should now be given the opportunity to boot from your master image. Choosing to do so will incur further magical results. Your system will now boot... Over the network! What's even cooler is that you'll be booted into the same basic installer environment you'd see if you were booted off a Mac OS X install disc, and you'll be walked through the steps required to install your Master System onto your computer. Um... OVER THE NETWORK!

There are some immediate advantages to a system such as this. First off, you can have a bunch of different Master System images for various build configurations in your lab. For instance, we can have a separate build for laptops and desktop machines. Cool! Also, this can all be automated (thanks to Automator integration) to make the process run almost entirely unattended. Sweet! And since the whole thing sits on the server and is available at all times, if a machines needs a rebuild, you just set it and forget it. Awesome!

But NetBoot has its drawbacks as well. Images — particularly large images — take for-freaking-ever to build. To give you an idea of how long, my near-36GB boot drive took an hour or so to clone to firewire, then 3-4 hours to be imaged by System Image Utility. So each build will take several hours to create. And God help you if you make a mistake on one of your images: the NetInstall images are read-only and can't (to my knowledge) be modified once they're built. NetInstall technology can't be used for non-package installers or updates either (again, to my knowledge), so you'll have to run all your Adobe and Microsoft updates by hand as usual. Also, one minor caveat that threw me at the outset: Mac OS X 10.5 server can only serve Mac OS X 10.5 builds. So you'll either be needing to update everything to Leopard or wait until your server and client OSes match.

I think I'm right on the crux of really needing this. I could probably live without it. Keep doing what I'm doing. But I do think I'm at a point where the benefits of using NetBoot outweigh its limitations. And I have enough resources now (like the required massive drive space and robust stable servers) that it's not impractical on the physical level. So, this summer I plan to use NetBoot to build my lab.

I mean, imagine this: you get your new systems over the summer, you unbox them, plug them into your network, set them to NetBoot (everybody say "command-n"! Good!) and go home for the night. You come in the next day and everything's basically done. You've just built your lab. Overnight. In your sleep. I don't know. Sounds pretty cool to me.

I'll let you know how it goes.

Oh, and by the way, in case you can't tell, I'm just now learning all this. It's still very new to me and there is a lot about it I don't know. So if anyone has any experiences or insights into using NetBoot (or if I get any of the facts wrong), I would absolutely love to hear about it. Please feel free to share your experiences in the comments.

Labels: , , , ,

Duplicate Computer Names and IPs

Wednesday, February 06, 2008
So there's an incredibly annoying and puzzling behavior in Mac OS X with regards to duplicate computer names on the LAN. Most Mac Admins probably know what I'm talking about. Here's the deal: Let's say you have a Mac Pro on your home network named Spanky and it has an IP address of 192.168.1.25. Let's also say, for the purposes of argument, that your best friend — who likes to emulate you in every way — has a Macbook named Spanky with an IP of 192.168.1.25 on his home network. (Hey, it could happen.) Now let's say your pal decides to come over, and he decides, "Hey, I think I'll bring my Macbook over so we can swap some illegally obtained music and pornography." He gets to your house to find you happily surfing the 'net. He whips out his Spanky and plugs it into your network, fires that puppy up, and Bam! All of a sudden your Mac Pro locks up. You can no longer surf. And you get an error message that looks a little something like this:


Duplicate Computer Name Alert: Why Me?
(click image for larger view)


You go to your Sharing Preferences (or your Terminal, or what-have-you) and, sure enough, your computer has been renamed. Renamed! WTF! Why is your computer, on your network, suddenly called "Spanky-2"? Because that's how Mac OS X handles duplicate computer names on the same network. It renames the existing computer to existing computer-2. Not the intruder. Not the new kid on the block. Your computer is now the computer formerly known as your computer. Why, it's pure genius, I tells ya! Brilliant!

Seriously, what in God's name were they thinking? Because, the way I see it, this goes beyond annoying into the realm of the dangerous.

Case in point: Let's say your Mac Pro Spanky is actually a server that provides services — authentication, Kerberos, LDAP, file sharing, the works — for a network full of computers. And let's say your friend is actually a guest on that network. When that guest plugs his computer into your network, and it just happens to be named the same thing as your server, God help you. You just lost — well, I'm not sure how much, but — a significant portion of your services. And all it takes is a computer name? I can rename any Mac on any network from any other Mac on that network by just changing my Mac's name? What's more, if you can get the IP of that server, you can bring it down entirely. That is total shit.

Strangely, it's been this way for at least three iterations of the OS now — since 10.3 — and it's still this way in 10.5. I am appalled. Can someone please explain the rationale for this to me? Please? 'Cause from where I sit, this is a major security flaw. To my mind it makes way more sense to have the newly installed machine make changes to it's configuration than to essentially be able to force changes on another machine. It's just backwards. And dangerous. And it desperately needs to be fixed.

UPDATE 1:
Mat X points out two very important facts: 1) the name change in this instance should only affect the Bonjour (.local) name of the duplicate machine, not it's actual name (the name it calls itself) or it's FQDN (the name as resolved by a DNS server), and 2) a client name change on the LAN should not be able to bring down a server with the same name because of the previous fact.

Dude, you're totally right, though I have seen, way back in the old days (10.2 maybe?) a duplicate name kill a server. So it did used to be possible. Nowadays though, Mac OS X Server has better, smarter naming conventions that prevent such things. I will say, though, that what prompted this was that I booted a clone of my own machine up on the LAN (same name, same IP) and it killed my computer, internet-wise, probably more because of the duplicate IP address. It's possible that all would have righted itself over time if I'd waited to see. I was just so annoyed by the behavior that I went on a bit of a rant. I still think it would be better behavior to leave the existing LAN client alone and make changes only to the new Mac on the LAN. But still, I got a little carried away.

Thanks for keeping me on my extremely bitchy and unscientific toes!

UPDATE 2:
So I've been doing some more testing on this issue. And while duplicate names on the network will not bring down your Mac OS X Server, a duplicate IP address will. Here's what I did:
  1. I changed my client's IP address to match that of the Mac OS X Server (both Leopard 10.5.1). My machine got kicked off the internet and I got this warning:

  2. I rebooted my client machine. Once the client had rebooted, the server got the above alert.
  3. At which point the server could not ping out to the internet. Bad Mac OS X! Bad!
So, while my rant is partially in error, there does seem to be a bit of a flaw in the way Mac OS X handles new duplicate clients — particularly duplicate IP addresses. And I maintain that a better way would be to only modify the behavior on the most recent addition to the LAN.

Labels: , , , , , ,

MacFUSE Follow-Up

Monday, February 04, 2008
I recently wondered aloud about the benefits of MacFUSE-supplied ssh access in a web development environment. A reader asked for a follow-up in the comments to that post, so I thought I'd just do a quickie today.

After writing the article, I tried out MacFUSE and the sshfs extension to that bundle. This combo facilitates the mounting of ssh-enabled computers directly on the Mac OS Desktop via a bundled GUI app, foregoing the need for an FTP client application. It was our hope that this would provide a more intuitive and user-friendly experience for our web developers. Unfortunately, in my experience there were bugs: the ssh filesystems often hung or had trouble mounting, often requiring a logout or restart to get things back to normal. (Mind you, this was over a month ago, in Mac OS X 10.4.something-or-other and God-knows-what version of MacFUSE and sshfs.) Also, from a user-simplification standpoint I felt that adding yet another application to the mix (the sshfs GUI app for mounting shares) didn't really do all that much to simplify things. In fact, in some ways, it complicated matters as it is not standard practice anywhere as yet.

That said, I really like the idea of mounting any sort of network share in the Finder. It's what's done in every aspect of our filesharing lives except web development, for some reason (that reason mainly being that Apple, inexplicably, still has not implemented this capability into the Finder.) As I mentioned in the original article, there are styles of development that take place outside the lab that are inherently different from what can happen inside a lab. The use of MAMP, for instance, is not friendly to a shared, multi-user environment, but is perfectly suited to a lone user on a single computer. So, again, I wonder aloud, do we provide a different way of working inside the lab than outside? A completely different workflow?

Ultimately, my answer will mostly be yes, I think. We provide it. We provide it right alongside the sorts of workflows that are common in the industry today. We provide both. We show students. We show teachers. And hopefully, someday, down the line, this will become the standard way of developing for the web. Until then we leave the old ways in place; they are not mutually exclusive.

My concern with MacFUSE and sshfs right now is stability. Because the product requires kernel extensions, and because I saw bugs in my limited testing, I am reluctant to put this on our machines. I can, however, use NFS from within our lab to provide a testing ground for the same sort of behavior that MacFUSE provides (i.e. ssh servers on the Desktop). And this will actually fit in nicely with the way we mount other shares in the lab as well (more nicely than the sshfs GUI, in particular). I will most likely implement this over the summer, however, as there's not enough time in the semester for it to really have much impact. Also, things will probably change a bit with the arrival of Leopard to the lab, and I don't see much point in making folks learn it twice.

Again, external development can be handled differently. So I may recommend, for advanced users, the use of MacFUSE outside the lab if they really end up digging the Desktop web development experience.

That's my take at this point on MacFUSE and web development. Hope it's useful to someone.

Labels: , , ,

Web Programming and MacFUSE

Wednesday, December 12, 2007
I'm not a web programmer by any means. But a component of the department I work in deals with the web from an artistic standpoint, and a subset of that group does, in fact, do programming. We have web programming classes.

Recently, one of the teachers of one of those classes made the charge that our approach to web programming is old and outmoded. Whether this is true or not is not really the issue. I've been looking for new ways to think about the systems end of that workflow because, well, that's my job, and because it's an inherently interesting challenge to me. How can we make our web development environment more user-friendly?

One general suggestion has been to make the experience more "OS-like." And one step in this direction is to have the web server mount on the Desktop, allowing the developer to work on her site as if it were local. That is, rather than firing up one of the popular SFTP clients and transferring files back and forth from the local machine to the server, the developer could mount her site — or actually, the share her site lives on — directly on the local filesystem. I have two options here: MacFUSE and NFS. I'm testing both currently. So far I've had a couple minor hiccups with MacFUSE's sshfs.app, but it looks to be a fairly smart and user-friendly implementation that web developers here might benefit from. And the NFS approach would work well also, though only from inside the network.

I'm curious what other Lab Admins are doing with regards to web development in their environments. How have you facilitated ease-of-use for a process that's inherently complicated? Or have you? Also, I'm curious if anyone is using MacFUSE — specifically the sshfs component — and what experiences you might have had with it, either positive or negative.

If any of you fine readers have any thoughts on this I would really love to hear them. I've been querying students, staff and faculty for ideas, but haven't come up with much. Maybe things here are perfect, but somehow I doubt it. And, as always, I really just want to make things better.

Please sound off in the comments if you're so inclined.

Labels: , , ,

"Disable Clear Text Passwords" Breaks Randomly

Wednesday, July 18, 2007
Typically, when you set up a Mac client to bind to a Mac server using Directory Access, there is one lone entry in the Security settings that is checked by default, and that is the "Disable clear text passwords" setting. This seems like a prudent default, and I always leave it checked. I assume that this means that passwords are then sent to the authentication server in some sort of hashed or encrypted form, and that both server and client are set up to negotiate this transaction properly out of the box. Indeed, most of the time this does not present any sort of problem whatsoever.

But for some reason, every now and then, completely randomly, Mac clients will suddenly and mysteriously be unable to authenticate to my Master Authentication Server. Seriously, nothing's changed. Just all of a sudden, Macs can't authenticate. The solution? Un-tick that "Disable clear text passwords" box under the LDAPv3 server configuration's Security tab. Next thing you know, everything's right as rain.


Directory Access: LDAPv3->Select Configuration->Edit
How in Hell Does this Break?

(click image for larger view)


Seriously, can anyone tell me what I'm doing wrong? 'Cause frankly, it's annoying.

Labels: , ,

External Network Unification Part 5: Almost There

Thursday, June 28, 2007
It's been quite some time since I've been able to post anything of any substance. This has a lot to do with the fact that I've been super busy relocating our department and participating in the gut renovation of our lab. This has been an immensely stressful process, but in the end I find that I've learned so much from it, I simply can't complain. I'm coming out a far better SysAdmin than I was going in. And that's a remarkably valuable thing to both me and my employers.

But moving and planning the physical aspects of the new lab has only been a portion of what I've been working on. This renovation has been the perfect opportunity to rebuild our network infrastructure, and part of said rebuilding has resulted in the near completion of our authentication unification project. At this point we've gone from eight different authentication servers — that is, anytime we created a new user, we had to do so on eight different systems — all the way on down to two. Which means that now, anytime we create a new user, we do so on two machines.

Our goal is to get it down to one, hopefully before the Fall semester begins. Our mail server is proving to be the most difficult machine to get working with LDAP authentication, mainly because it authenticates mail users through the wonders of some weird combination of authd, Courier and PAM, and we've yet to crack the magical code that gets these all working in tandem via LDAP. Aside from Mail, though, everything is done. So I thought I'd take a bit of my hard-earned vacation and loosely describe to you how it's all working.

Before I start I'd like to just acknowledge all the help I've had from my fellow SysAdmins in the department. I had a huge amount of assistance on the *NIX server side of things, as well as with network infrastructure and even some last-minute PHP finagling without which this project would have taken significantly longer. In fact, all I really had to do was build the authentication servers and clearly articulate what I wanted. I'm extremely grateful to everyone who helped out.

The little bit of network infrastructure I mentioned is our DMZ. We now have a proper — and more importantly, properly secured — DMZ on which to place an authentication server. I won't go into too much detail here, but suffice to say, having a secure DMZ gives us all kinds of options for authentication between internal and external networks, and makes me feel a whole lot better about using Mac OS X Server as our authentication system for both networks.

Yes, we are using Mac OS X Server to authenticate our entire network. The reason is because Mac OS X Server is the most mature and usable implementation of LDAP for user authentication available on the market today. Is it perfect? No. Is it completely secure? Probably not. Is there anything that even comes remotely close to being able to handle the complexities of user management and database redundancy across platforms with such remarkable ease-of-use? Nope. Nothing. We tried building our own custom LDAP server, which would have been excruciating, and would have taken forever. We tried Red Hat's Directory Server, which looks like it will eventually turn into something to match Mac OS X Server, but which just wasn't yet up to snuff. Nothing matched Mac OS X Server, which did everything we wanted it to, right out of the box and with a minimum of fuss. In fact, once the user database is built, building a Mac OS X master or replica authentication server is a complete and total breeze. At the time of our building and testing it was really the only practical option.

So, here in a nutshell, is what we have:

Internal Network
All authentication originates from the internal network. Passwords can only be changed from the internal network at this time, which is by design. Systems on the internal network include:
  • Master Authentication Server
    Hosts authentication for... Well... Everything, really. This is essentially the same server we used all last year for all our internal authentication needs for Mac, Linux and Windows workstations. It's now being used to push authentication to the external network as well.
  • Internal Replica Authentication Server
    This provides replication of the Master. Should the master fail, the Replica is intended to pick up services (though this doesn't always work perfectly).
  • File Servers
    We have two file servers on the internal network — a Mac and a Linux box — both of which authenticate directly against the Master.
  • Workstations
    We have about 30 Mac, Windows and Linux machines all authenticating to the Master.

DMZ
The DMZ sits between the Big Bad Internet (BBI) and the internal network. It has its own firewall that is fairly strict about what can get in from the BBI. All DMZ authentication originates from the internal network, but is provided by a single server which sits on the DMZ. Systems on the DMZ include:
  • External Authentication Server
    This server is also a replica of our Master, but it's not intended as a failsafe. Rather, it provides authentication services to the entire DMZ. It gets its user database, of course, from the Master. But for other systems to bind to an LDAP server, its role must either be "Master" or "Replica." Setting the role to "Connected to a Directory Server" won't work. In addition to sitting on our DMZ, which is properly firewalled against the harsh realities of the Big Bad Internet (BBI), this system also makes use of its own strict local firewall for an extra added layer of security. Also, all replication communication between Replica (DMZ) and Master (Internal) is encrypted.
  • Data Server
    In addition to unifying authentication, we've also consolidated data storage and access wherever possible. In the past, for instance, movies streamed from the Quicktime Server were stored on that machine's local drive. Web sites were stored on our web server. So, building a web site that used Quicktime Streaming required users to log into two separate machines — the Web Server and the Quicktime Streaming Server. Now we're storing all user-generated content on a separate, dedicated machine — our Data Server — and sharing that machine out to the various servers via NFS. Centralizing this data store means users have only to log on to one server for anything they ever want to do. And also that only that server needs to authenticate users. And yes, that server authenticates them via LDAP on our External Authentication Server. All neat and tidy. Internal and external home account data is still segregated, however — users still have separate internal and external data storage. Though, if we could figure out how to do it securely, this could change.
  • Quicktime Streaming Server
    This machine also uses its own local firewall. It gets its user database from our External Authentication Server over secure channels using the "Connected to a Directory System" as its role currently. Ultimately, however, because of the Data Server, this machine will not need to authenticate users. We are leaving the ability open temporarily to accommodate legacy users.
  • Drupal CMS
    Our new Community site is built on the Drupal engine. We're using the LDAP module to authenticate to the External Authentication Server. Drupal's LDAP module is simple and easy to set up, as is the Drupal system as a whole. So far we're very happy with it.
  • Computer Reservations System
    This is a custom web app built long ago by a former student. We've (and by "we" I mean my colleague) basically hacked the PHP code to authenticate via LDAP rather than MySQL.
  • Mail Server
    Currently not authenticating to the External Authentication Server. We're working on this and hope to have it working by the beginning of the school year.

The Future
Yes, there's more we want to do. It's always amazing how, once you've completed something, you immediately start seeing ways to make it better.
  • More Redundancy
    Ultimately, in addition to the Replica, I would also like to automate a clone of the Master's boot drive to an external firewire drive as sort of an ultimate safety. Should anything ever go wrong with the Master, I simply plug the firewire clone into virtually any Mac system on the internal network and I'm back on my feet. It might also be wise to have some sort of failsafe for external authentication as well.
  • More Security
    while our setup is fairly secure right now, there are a few areas I'd like to beef up even more when I get a chance. In particular, our CMS connection is not as secure as I'd like it to be. And ultimately I'd like to harden every machine on the DMZ to the best of my ability.
  • More Unification
    Anything else we can unify — and at this point that's mostly internal and external data — I'm open to considering. It's going to be really interesting for me to look critically at what we've done so far and find the flaws and refine the system. But I'll constantly be looking at ways to simplify our current setup even further without compromising security. The easier our network is to use, the more useful it becomes. We've come a long way, but I'm sure we can find even better ways to do things.
  • More Services
    Now that we have an infrastructure in place for user creation, we can add services freely to our network without the worry of creating users for said services. New services need only the ability to authenticate via LDAP. We're already planning an equipment checkout system, and possibly some calendaring systems.

So, I've just finalized the master authentication server. It's done. Built. Finished. Kaput. The rest of our servers are still in various states of finality, and we have until September to lock them down. But right now, unified authentication is, for all intents and purposes (and with the exception of mail), working. And we couldn't be happier. The ultimate test will be, of course, letting users loose on this new infrastructure. I'm betting they'll like it almost as much as we do. At least the ones who know the old system. New users will be none the wiser. Ain't that always the way?

*Sigh*

Labels: , , , , ,

Replica Reset Voodoo (That Works!)

Saturday, February 10, 2007
So today, after downgrading my master server to 10.4.7, I kept getting an error on my replica. So I decided to reset the replica by demoting it to a "Standalone" role, and then re-promoting it to the "Replica" role. But even after doing this, the error message persisted. The message was telling me to check the logs at:

/var/run/openldap-slurp/replica

and doing so did reveal errors like:

ERROR: Type or value exists: modify/add: memberUid: value #0 already exists

The solution was to again demote the replica to standalone status and then archive all the files in:

/var/run/openldap-slurp/replica

to anywhere else. I put them in a folder called "old." Just get 'em out of the way. Once this was done I was able to promote my replica without receiving error messages.

Yay! That wasn't too bad.

Oh, and you may be asking yourself how I knew to do this. Well, to be honest, I don't really remember. I just know that at some point in the past there was a problem I'd had with a replica and it was caused by stale files. So, since my ultimate goal was to start from scratch, I just got everything out of the way. And lo and behold. It worked. Sorry for the voodoo explanation, though. I wish I could be more explicit. Hell, I wish I fully understood what I was dealing with. But I don't. And, though it pains me to say this, I don't have time to figure it out.

But y'know? I'll take the cure even if I don't know what caused the disease.

Labels: , , ,

Mac OS X Server 10.4.8 Breaks Windows Quotas

Friday, February 09, 2007
It's great to finally have something systems-related to post about amidst the endless bureaucracy that fills my days lately. Of course that means that — yup, you guessed it — something broke. But hey, that's what it's all about. Well, that and the fixing of said brokeness, of course.

So we recently discovered that our Windows clients were suddenly, and without explanation, able to greatly exceed their roaming profile quotas. In fact, looking at the roaming profile drive showed users with upwards of 25 GBs in their roaming profiles, which have quota limits of 50 MB. Not only that, but further testing revealed that Windows client machines wouldn't even complain if they went over quota. Any SMB connection to the roaming profile drive could exceed the quota limit without so much as a complaint from server or client. AFP worked. UNIX worked. But quotas were ignored over SMB. What the fuck?

For three days I've been trying to track this problem down, testing all sorts of quota scenarios and SMB configurations in between meetings and meetings and more meetings. Eventually, when I can't make headway on a problem, I start thinking it might just be a bug. So I started poking around in the Apple Discussions, and I found one and only one complaint of a similar nature: 10.4.8 Server with broken quotas on Windows. Had I recently done a system update that perhaps broke quotas?

So I started thinking about what in a system update could break such a thing. How do quotas work? There is no daemon. A colleague suggested that they were part of the kernel. Had I done anything that would have replaced the kernel in the last month or two?

The answer was yes. Over the winter break I had decided to update the server to version 10.4.8. Upon realizing this I began to strongly suspect that Mac OS X Server 10.4.8 contained a bug that broke quotas over SMB. Fortunately, as is often my practice, I'd made a clone of my 10.4.7 server to a portable firewire drive before upgrading. Testing my theory would be a simple matter of booting off the clone.

Sure enough, after booting from the clone, quotas began behaving properly on Windows clients again. Because I had the clone, reverting the 10.4.8 server back to 10.4.7 was a simple matter of cloning the contents of the firewire to the server's internal drive and rebooting. Voilà! Problem solved!

From now on I think I'll hold off on server updates unless I really, really need them. When it comes to servers, I think the old adage is best: If it ain't broke, don't fix it.

Labels: , , , ,

Directory Access Via the Command Line

Saturday, November 18, 2006
I recently finally had occasion to learn some incredibly handy new command-line tricks I've been wanting to figure out for some time. Namely, controlling Directory Access parameters. I've long hoped for and wondered if there was a way to do this, and some of my more ingenious readers finally confirmed that there was, in the comments to a recent article. And now, with initiative and time, I've figured it all out and want to post it here for both your and my benefit, and for the ages (or at least until Apple decides to change it).

The occasion for learning all this was a wee little problem I had with my Mac OS X clients. For some reason, which I've yet to determine, a batch of them became hopelessly unbound from the Open Directory master on our network.


Weird Client Problem: "Some" Accounts Available? Huh?
(click image for larger view)


The solution for this was to trash their DirectoryService preferences folder, and then to rebind them to the server. This was always something I'd done exclusively from the GUI, so doing it on numerous clients has always been a pain: log into the client machine, trash the prefs, navigate to and open the Directory Access application, authenticate to the DA app, enter the OD server name, authenticate for directory binding, and finally log back out. Lather, rinse, repeat per client. Blech! The command-line approach offers numerous advantages, the most obvious being that this can all be scripted and sent to multiple machines via Apple Remote Desktop. No login required, no GUI needed, and you can do every machine at once.

The command-line tools for doing all this are not exactly the most straightforward set of commands I've ever seen. But they exist, and they work, and they're quite flexible once you parse them out. The first basic thing you need to understand is that there are two tools for accomplishing the above: dscl and dsconfigldap. The dsconfigldap command is used to add an LDAP server configuration to Directory Access. The dscl command adds that server to the Authentication and Contacts lists in Directory Access, and is used to configure the options for service access.

So typically, your first step in binding a client to an OD master in Directory Access is to add it to the list of LDAPv3 servers. This can be done via the command-line with dsconfigldap, like so:

sudo dsconfigldap -s -a systemsboy.com -n "systemsboy"


We like to use directory binding in our configuration, and this can be accomplished too:

sudo dsconfigldap -u diradmin -i -s -f -a systemsboy.com -c systemsboy -n "systemsboy"


The above command requires a directory administrator username and interactively requests a password for said user. But if you want to use ARD for all of this, you'll need to supply the password in the command itself:

sudo dsconfigldap -u diradmin -p 'DirectoryAdmin_Password' -s -f -a systemsboy.com -c systemsboy -n "systemsboy"


Directory Access: Adding an OD Server Configuration
(click image for larger view)


So, there you have it. You've now added your OD master to your list of LDAPv3 servers. You can see this reflected immediately in the Directory Access application. But, unlike in DA, the command does not automatically populate the Authentication and Contacts fields. Your client will not authenticate to the OD master until you have added the OD server as an authentication source. To do this you use dscl. You'll need a custom Search Path for this to work. You may already have one, but if you don't you can add one first:

dscl -q localhost -create /Search SearchPolicy dsAttrTypeStandard:CSPSearchPath


And now add the OD master to the Authentication search path you just created:

sudo dscl -q localhost -merge /Search CSPSearchPath /LDAPv3/systemsboy.com


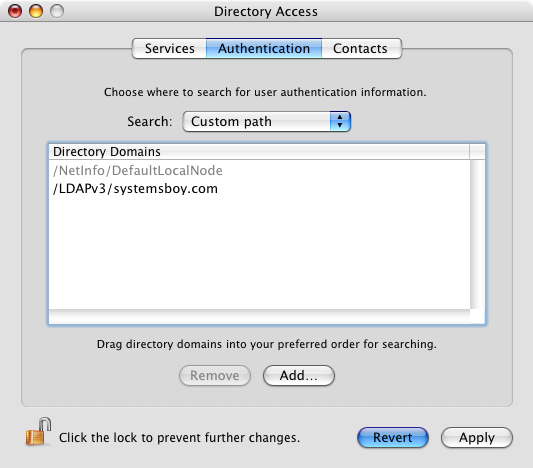
Directory Access: Adding an OD Authentication Source
(click image for larger view)


If you want your OD server as a Contacts source as well, run:

sudo dscl -q localhost -merge /Contact CSPSearchPath /LDAPv3/systemsboy.com


Again, this change will be reflected immediately in the DA application. You may now want to restart Directory Services to make sure the changes get picked up, like so:

sudo killall DirectoryService


And that's really all there is to it. You should now be able to log on as a network user. To test, simply id a know network-only user:

id spaz


If you get this error:

id: spaz: no such user


Something's wrong. Try again.

If all is well, though, you'll get the user information for that user:

uid=503(spaz) gid=503(spaz) groups=503(spaz)


You should be good to go.

And, if you want to view all this via the command-line as well, here are some commands to get you started.

To list the servers in the configuration:

dscl localhost -list /LDAPv3


To list Authentication sources:

dscl -q localhost -read /Search


To list Contacts sources:

dscl -q localhost -read /Contact


A few things before I wind up. First, some notes on the syntax of these commands. For a full list of options, you should most definitely turn to the man pages for any of these commands. But I wanted to briefly talk about the basic syntax, because to my eye it's a bit confusing. Let's pick apart this command, which adds the OD master to the configuration with directory binding and a supplied directory admin username and password:

sudo dsconfigldap -u diradmin -p 'DirectoryAdmin_Password' -s -f -a systemsboy.com -c systemsboy -n "systemsboy"


The command is being run as root (sudo) and is called dsconfigldap. The -u option tells the command that we'll be supplying the name of the directory admin to be used for binding to the OD master (required for such binding). Next we supply that name, in this case diradmin. The -p option allows you to specify the password for that user, which you do next in single quotes. The -s option will set up secure authentication between server and client, which is the default in DA. The -f option turns on ("forces") directory binding. The -a option specifies that you are adding the server (as opposed to removing it). The next entry is the name of the OD server (you can use the Fully Qualified Domain Name or the IP address here, but I prefer FQDN). The -c option specifies the computer ID or name to be used for directory binding to the server, and this will add the computer to the server's Computers list. And finally, the -n option allows you to specify the configuration name in the list of servers in DA.

Now let's look at this particular use of dscl:

sudo dscl -q localhost -merge /Search CSPSearchPath /LDAPv3/systemsboy.com


Again, dscl is the command and it's being run as root. The -q option runs the command in quiet mode, with no interactive prompt. (The dscl command can also be run interactively.) The localhost field specifies the client machine to run the command on, in this case, the machine I'm on right now. The -merge flag tells dscl that we want to add this data without affecting any of the other entries in the path. The /Search string specifies the path to the Directory Service datasource to operate on, in this case the "Search" path, and the CSPSearchPath is our custom search path key to which we want to add our OD server, which is named in the last string in the command.

Whew! It's a lot, I know. But the beauty is that dscl and dsconfigldap are extremely flexible and powerful tools that allow you to manipulate every parameter in the Directory Access application. Wonderful!

Next, to be thorough, I thought I'd provide the commands to reverse all this — to remove the OD master from DA entirely. So, working backwards, to remove the server from the list of Authentication sources, run:

sudo dscl -q localhost -delete /Search CSPSearchPath /LDAPv3/systemsboy.com


To remove it from the from the Contacts source list:

sudo dscl -q localhost -delete /Contact CSPSearchPath /LDAPv3/systemsboy.com


And to remove a directory-bound configuration non-interactively (i.e. supplying the directory admin name and password):

sudo dsconfigldap -u diradmin -p 'DirectoryAdmin_Password' -s -f -r systemsboy.com -c systemsboy -n "systemsboy"


If that's your only server, you should be back to spec. Just to be safe, restart DirectoryService again:

sudo killall DirectoryService


If you have a bunch of servers in your Directory Access list, you could script a method for removing them all with the above commands, but it's probably easier to just trash the DirectoryService prefs (in /Library/Preferences) and restart DirectoryService.

Lastly, I'd like to end this article with thanks. Learning all this was kind of tricky for me, and I had a lot of help from a few sources. Faithful readers MatX and Nigel (of mind the explanatory gap fame) both pointed out the availability of all this command-line goodness. And nigel got me started down the road to understanding it all. Most of the information in this article was also directly gleaned from another site hosted in my home state of Ohio, on a page written by a Jeff McCune. With the exception of a minor tweak here and there (particularly when adding Contacts sources), Jeff's instructions were my key to truly understanding all this, and I must thank him profusely. He made the learning curve on all this tolerable.

So thanks guys! It's help like this that makes having this site so damn useful sometimes, and it's much appreciated.

And now I'm off to go bind some clients command-line style!

UPDATE:
Got to test all this out real-world style today. Our server got hung up again, and we had the same problem I described at the head of this article. No one could log in. So I started trying to use the command-line to reset the machines. I had one major snag that caused it all to fail until I figured out what was going on. Seems I could not bind my machines to the server using the -s flag (secure binding). I had thought that this was the default, and that I was using it before, but now I'm not so sure. In any case, if you're having trouble binding or unbinding clients to a server, try the dsconfigldap command without the -s flag if you can, like so:

sudo dsconfigldap -u diradmin -p 'DirectoryAdmin_Password' -f -a systemsboy.com -c systemsboy -n "systemsboy"

That's what worked for me. I'm a little concerned that this is indicative of a problem on my server, but now's not really the time to go screwing with stuff, so I'll leave it alone for the time being.

This update brought to you by the little letter -s.

Labels: , ,

Networked Home Accounts and The New RAID

Tuesday, October 24, 2006
We recently installed in our machine room a brand-spankin' new RAID for hosting network home accounts. We bought this RAID as a replacement for our aging, and horrendously unreliable Panasas RAID. The Panasas was a disaster for almost the entire three-year span of its lease. It used a proprietary operating system based on some flavor of *NIX (which I can't recall right at this moment), but that had all sorts of variations from a typical *NIX install that made using it as a home account server far more difficult than it ever should have been. To be fair, it was never really intended for such a use, but was rather created as a file server cluster for Linux workstations that can be easily managed directly from a web browser, as opposed to the command-line. It was really built for speed, not stability, and it was really completely the wrong product for us. (And for the record, I had nothing to do with its purchase, in case you're wondering.)

What the Panasas was, however, was instructive. For three years we lived under the shadow of its constant crashing, the near-weekly tcp dumps and help requests to the company, and angry users fed up with a system that occasionally caused them to lose data, and frequently caused their machines to lock up for the duration of a Panasas reboot, which could be up to twenty minutes. It was not fun, but I learned a lot from it, and it enabled me to make some very serious decisions.

My recent promotion to Senior Systems Administrator came just prior to the end of our Panasas lease term. This put me in the position of both purchasing a new home account server, and of deciding the fate of networked home accounts in the lab.

If I'd learned anything from the experience with the Panasas it was this: A home account server must be, above all else, stable. Every computer that relies on centralized storage for home account serving is completely and utterly dependent on that server. If that server goes down, your lab, in essence, goes down. When this starts happening a lot, people begin to lose faith in a lot of things. First and foremost, they lose faith in the server and stop using it, making your big, expensive network RAID a big, expensive waste of money. Secondly, they lose faith in the system you've set up, which makes sense because it doesn't work reliably, and they stop using it, favoring instead whatever contingency plan you've set up for the times when the server goes down. In our case, we set up a local user account for people to log into when the home account server was down. Things got so bad for a while that people began to log in using this local account more than they would their home accounts, thus negating all our efforts at centralizing home account data storage. Lastly, people begin to lose faith in your abilities as a systems administrator and lab manager. Your reputation suffers, and that makes it harder to get things done — even improvements. So, stability. Centralization of a key resource is risky, in that if that resource fails, everything else fails with it. Stability of crucial, centralized storage was key if any kind of network home account scenario was going to work.

The other thing I began to assess was the whole idea of networked home accounts themselves. I don't know how many labs use networked home accounts. I suspect there are quite a few, but there are also probably a lot of labs that don't. I know I've read about a lot of places that prefer local accounts that are not customized and that revert to some default state at every log in/out. Though I personally really like the convenience of customized network home accounts that follow you from computer to computer throughout a facility, it certainly provides a fair amount of hassle and risk. When it works it's great, but when it doesn't work, it's really bad. So I really began to question the whole idea. Is this something we really needed or wanted to continue to provide?

My ultimate decision was intimately linked to the stability of the home account server. From everything I've seen, networked home accounts can and do work extremely well when the centralized storage on which they reside is stable and reliable. And there is value to this. I talked to people in the lab. By and large, from what I could glean from my very rudimentary and unscientific conversations with users, people really like having network home accounts when they work properly. When given the choice between a generic local account or their personalized network account, even after all the headaches, they still ultimately prefer the networked account. So it behooves us to really try to make it work and work well. And, again, everything I saw told me that what this really required, more than anything else, was a good, solid, robust and reliable home account server.

So, that's what we tried our best to get. The new unit is built and configured by a company called Western Scientific, which was recommended to me by a friend. It's called the Fusion SA. It's a 24-bay storage server running Linux Fedora Core 5. We've populated 16 of the bays with 500GB drives and configured them at RAID level 5, giving us, when all is said and done, about 7TB of networked storage with room to grow in the additional bays should we ever want to do so. The unit also features a Quad-port GigE PCIX card which we can trunc for speedy network access. It's big and it's fast. But what's most important is its stability.

Our new RAID came a little later than we'd hoped, so we weren't able to test it before going live with it. Ideally, we would have gotten the unit mid-summer and tested it in the lab while maintaining our previous system as a fall-back. What happened instead was that we got the unit in about the second week of the semester, and outside circumstances eventually necessitated switching to the new RAID sans testing. It was a little scary. Here we were in the third week of school switching over to a brand new but largely untested home account server. It was at this point in time that I decided, if this thing didn't work — if it wasn't stable and reliable — networked home accounts would become a thing of the past.

So with a little bit of fancy footwork we made the ol' switcheroo, and it went so smoothly our users barely noticed anything had happened. Installing the unit was really a simple matter of getting it in the rack, and then configuring the network settings and the RAID. This was exceptionally quick and easy, thanks in large measure to the fact that Western Scientific configured the OS for us at the factory, and also to the fact that they tested the unit for defects prior to shipping it to us. In fact, our unit was late because they had discovered a flaw in the original unit they had planned to ship. Perfect! If that's the case, I'm glad it was late. This is exactly what we want from a company that provides us with our crucial home account storage. If the server itself was as reliable as the company was diligent, we most like had a winner on our hands. So, how has it been?

It's been several weeks now, and the new home account server has been up, without fail or issue, the entire time. So far our new home account server has been extremely stable (so much so that I almost forget about it, until, of course, I walk past our server room and stop to dreamily look upon its bright blue drive activity lights dutifully flickering away without pause). And if it stays that way, user confidence should return to the lab and to the whole idea of networked home accounts in fairly short order. In fact, it seems like it already has to a great extent. I couldn't be happier. And the users?... Well, they don't even notice the difference. That's the cruel irony of this business: When things break, you never hear the end of it, but when things work properly, you don't hear a peep. You can almost gauge the success or failure of a system by how much you hear about it from users. It's the ultimate in "no news is good news." The quieter the better.

And 'round these parts of late, it's been pin-drop quiet.

Labels: , , ,

Publishing iCal Calendars via Mac OS X Server

Friday, October 13, 2006
So a lot of people are familiar with my articles on publishing iCal calendars to the 'net with box.net. But it turns out that I also have to provide iCal publishing for staff on our internal network, and I do this using a Mac OS X server. Recently, after rebuilding my server, I had some problems with it and had to set it all up again after not having done it in quite some time. It's pretty easy, but there's one snag I got hung up on. We'll get to that in a minute. But first let's run through the steps to set this up.

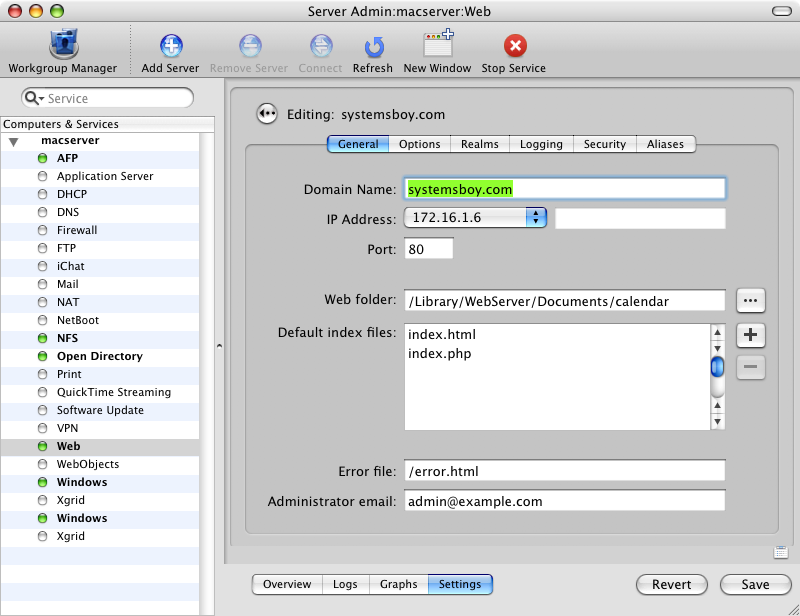
First and foremost, setting up iCal publishing on Mac OS X Server requires the web server to be running. This can easily be done with the flick of a switch in the Server Admin application. But before we start the service, let's make all our settings. The first thing we need to do is set the root folder for our site. Now in my situation I'm not actually doing any web serving. All I'm doing is calendar serving, and only on our internal network, and that's all I'll describe here. The standard site root folder in Mac OS X Server is /Library/WebServer/Documents. To make things a bit cleaner and easier I'll put all my calendars in a subfolder of this called "calendar," and since that's all I'm serving I'll make that my site root: /Library/WebServer/Documents/calendar. I've given my site a name — systemsboy.com — and manually set the IP address. Otherwise I've left everything alone.


Server Admin: General Web Settings
(click image for larger view)

Next up we want to set some options. WebDAV is, of course, key to all this. Without it the calendars can't be served in a form we like. So turn on WebDAV. I've also left Performance Caching on and turned everything else off. Again, this is just for serving calendars.


Server Admin: Web Options
(click image for larger view)


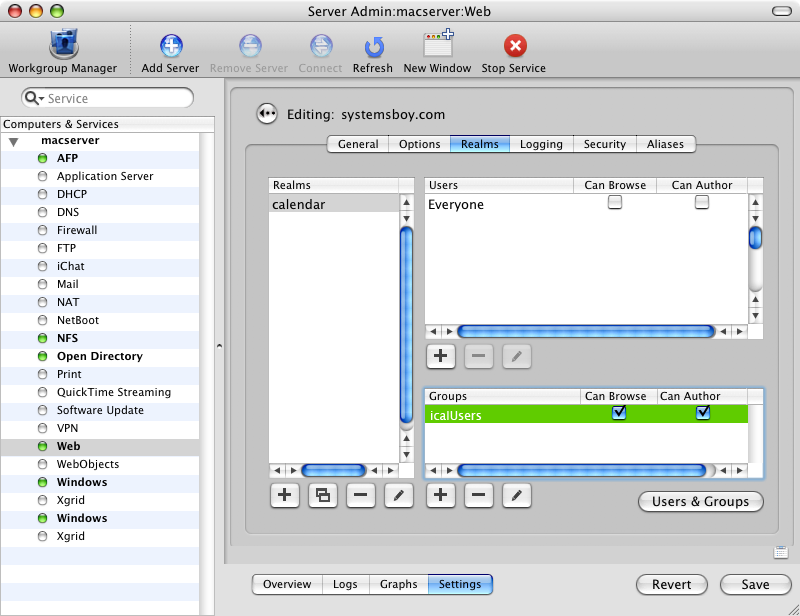
Finally, we need to set up our "realm" which is a place where WebDAV/calendar users can share files. To do this, first add a realm to the first box on the left there by clicking the big plus sign beneath it. Give the realm a name, and give it the path to the calendar folder we set as our site root. I am just using "Basic" authentication as this is only going on our internal network and security isn't a big concern in this instance. Once your realm is set up, save the changes and then add some users or a group to the boxes to the right of the realm box. In my setup I added a group called "icalusers" which contains all the users who need to and are permitted to share calendars. I've set the group to be allowed to browse and author. This is necessary for users to read from and publish to the server respectively. You can do the same with individual users in the upper box. Once you've got that set up, save your changes and start the web service.

Server Admin: Realms
(click image for larger view)


That's pretty much it, except for one crucial thing: permissions. I always seem to forget this, but permissions on the calendar folder must be properly set. Since WebDAV permissions are handled by the web server, the proper way to set this up is to give the user that runs the web server ownership and read/write access to the calendar folder. In most cases that user is called www. It's probably a good idea to give group ownership over to the www user as well. So before this will work you need to run:

sudo chown www:www /Library/WebServer/Documents/calendar

To set the ownership to www, and:

sudo chmod 770 /Library/WebServer/Documents/calendar

To give said user full access to the folder.
[Updated to reflect user comments. See note at end of article for details. -systemsboy]

Once that's done, just start the web service in the Server Admin application by selecting the "Web" service in the far left-hand column and pressing the big green "Start Service" button in the app's toolbar. You should now be able to publish and subscribe to calendars on your Mac OS X Server from iCal. The publishing URL for my example would look something like this:
http://systemsboy.com

And subscribing to the calendar, where "Birthdays" is the calendar name, would look like:
http://systemsboy.com/Birthdays.ics

Simple, right? Yeah, I thought so too. Just watch those permissions! Bites me every time.

NOTE:
I had originally reported that permissions for the calendar folder should be set to 777. A couple readers pointed out in the comments section that this is not the case. I have edited this article to reflect their suggestions which are a much better solution than my original one.

Thanks, guys, for pointing that out! Really good to know!

Labels: , , , ,